Deploy on Rancher v2xx
On-Premise InfraDeploy On-Premise Infra on Rancher v2.x.x
![]()
This tutorial explains how to setup a highly available 3-nodes cluster to run OctoPerf On-Premise Infra. As a result, we use Rancher to provision a Kubernetes cluster.
We're going to use cloud instance on Digital Ocean for both the rancher server and the rancher worker nodes.
Prerequisites
This tutorial requires:
- A Digital Ocean account,
- Basic knowledge around managing Ubuntu linux via SSH,
- And basic knowledge of how Docker works.
Topology
The infrastructure built in this tutorial works as following:
- rancher-server: hosts the rancher server only,
- rancher-node-1: acts as etcd, control plane and worker,
- rancher-node-2: acts as etcd, control plane and worker,
- rancher-node-3: acts as etcd, control plane and worker.
All the pods are running on rancher-node-X. Elasticsearch is deployed on all 3 nodes. OctoPerf On-Premise Infra Backend is deployed on all 3 nodes.
Rancher Server
First, we need to spin-up the Rancher server. The server is going to run on a dedicated instance:
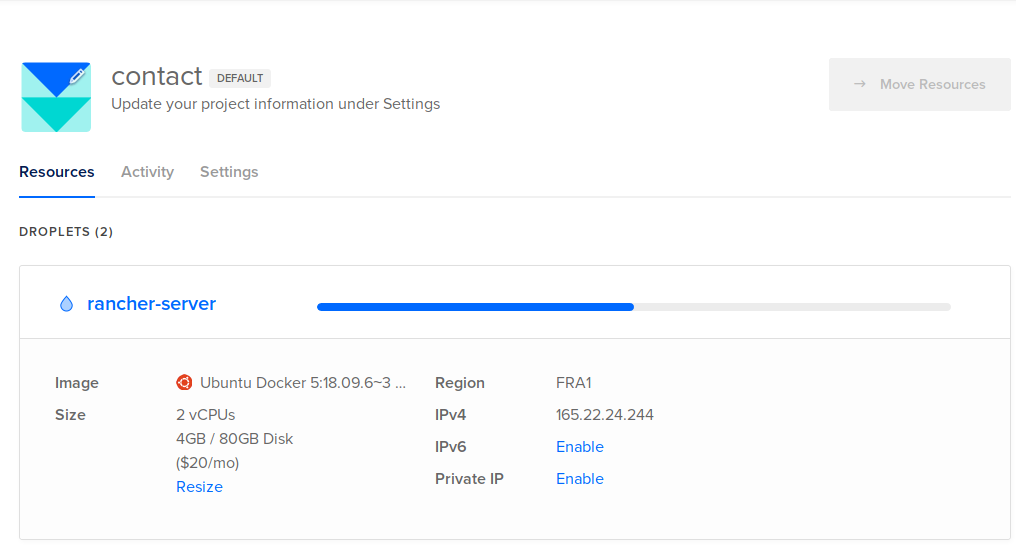
- Spin up a Digital Ocean instance by selecting
MarketplaceDocker xxx on Ubuntutype of instance. Name itrancher-serverto easily recognize it. A server with2 CPUsand4GB RAMis enough for testing purpose
- SSH into the instance once it up and running, and disable the firewall:
root@rancher-server:~# sudo ufw disable
Firewall stopped and disabled on system startup
- Start the rancher
v2.x.xserver:
root@rancher-server:~# sudo docker run -d --restart=unless-stopped -p 80:80 -p 443:443 rancher/rancher
- It should be running shortly:
root@rancher-server:~# docker ps
CONTAINER ID        IMAGE               COMMAND             CREATED             STATUS              PORTS                                      NAMES
b37abe78bfd3        rancher/rancher     "entrypoint.sh"     11 seconds ago      Up 9 seconds        0.0.0.0:80->80/tcp, 0.0.0.0:443->443/tcp   stoic_kalam
- Once Rancher is running, we need to configure it to work properly. Browse to
https://RANCHER_SERVER_IP/, whereRANCHER_SERVER_IPis the public ip of the instance,
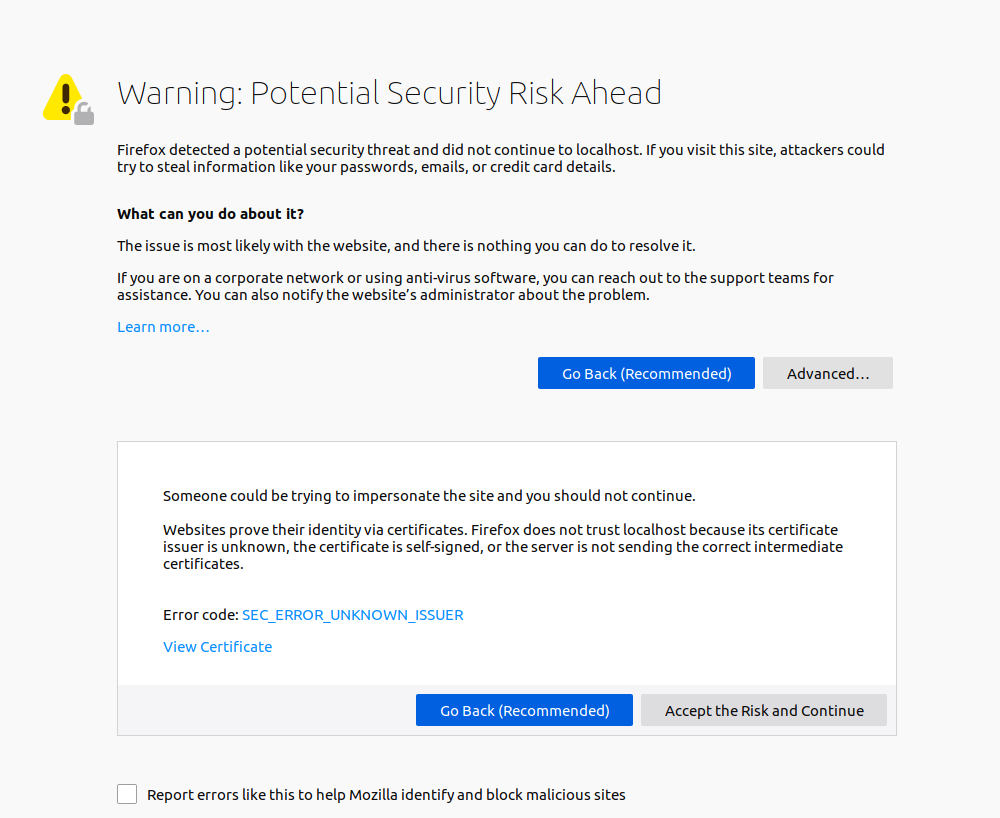
Firefox will complain about the invalid certificate. Proceed by pressing Accept the Risk and Continue.
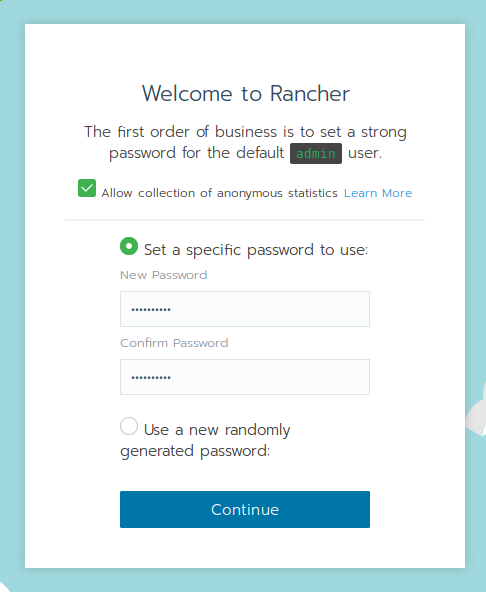
Configure the admin password and click on Continue.
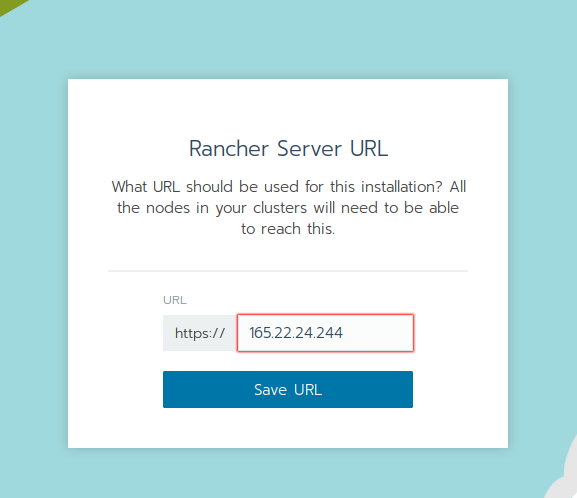
Set the rancher server url to the public IP address of the instance hosting the server. 165.22.24.244 in my case is the public IP which has been automatically assigned to the rancher-server Digital Ocean instance.
Rancher server is up and properly configured. Let's now setup the worker nodes.
Rancher Nodes
3 rancher nodes are going to host the docker containers to run OctoPerf On-Premise Infra. Launch 3 nodes (with Docker preinstalled from Marketplace) and name them rancher-node-1, rancher-node-2 and rancher-node-3 respectively.
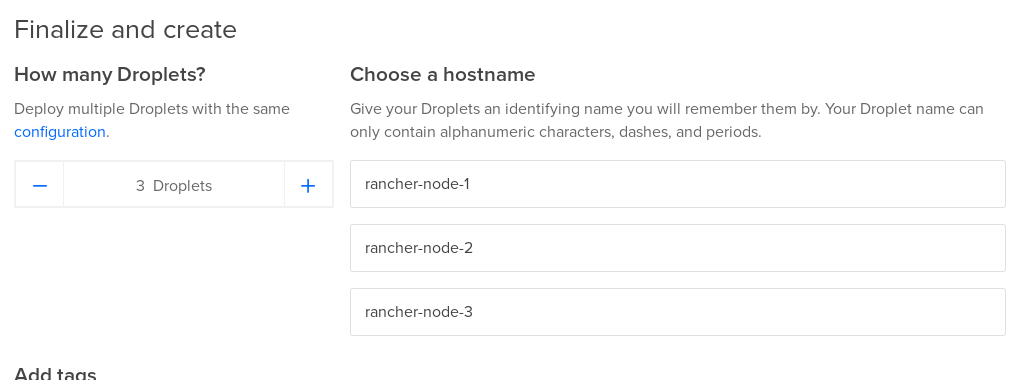
2 CPUs with 4GB RAM standard instances are enough for testing purpose. Consider using at least 6 CPUs with 16GB RAM per node in a production setup.

Once the nodes are up and running:
- SSH into each node,
- Increase
vm.max_map_countpermanently:
root@rancher-node-1:~# sudo nano /etc/sysctl.conf
- Add the following line to the end of the
sysctl.conffile:
vm.max_map_count=262144
- Save and quit, then update
systcl:
root@rancher-node-1:~# sudo sysctl -p
vm.max_map_count = 262144
- Disable the firewall: (otherwise networking between nodes will fail)
root@rancher-node-1:~# sudo ufw disable
Firewall stopped and disabled on system startup
- Install basic software for proper security and clock synchronization:
root@rancher-node-1:~# sudo apt install -y fail2ban ntp
Repeat those operations for rancher-node-1, rancher-node-2 and rancher-node-3. We now have 3 nodes with Docker installed and preconfigured to easily run Elasticsearch.
Rancher Cluster Configuration
Let's create the Kubernetes cluster using Rancher via the Web UI.
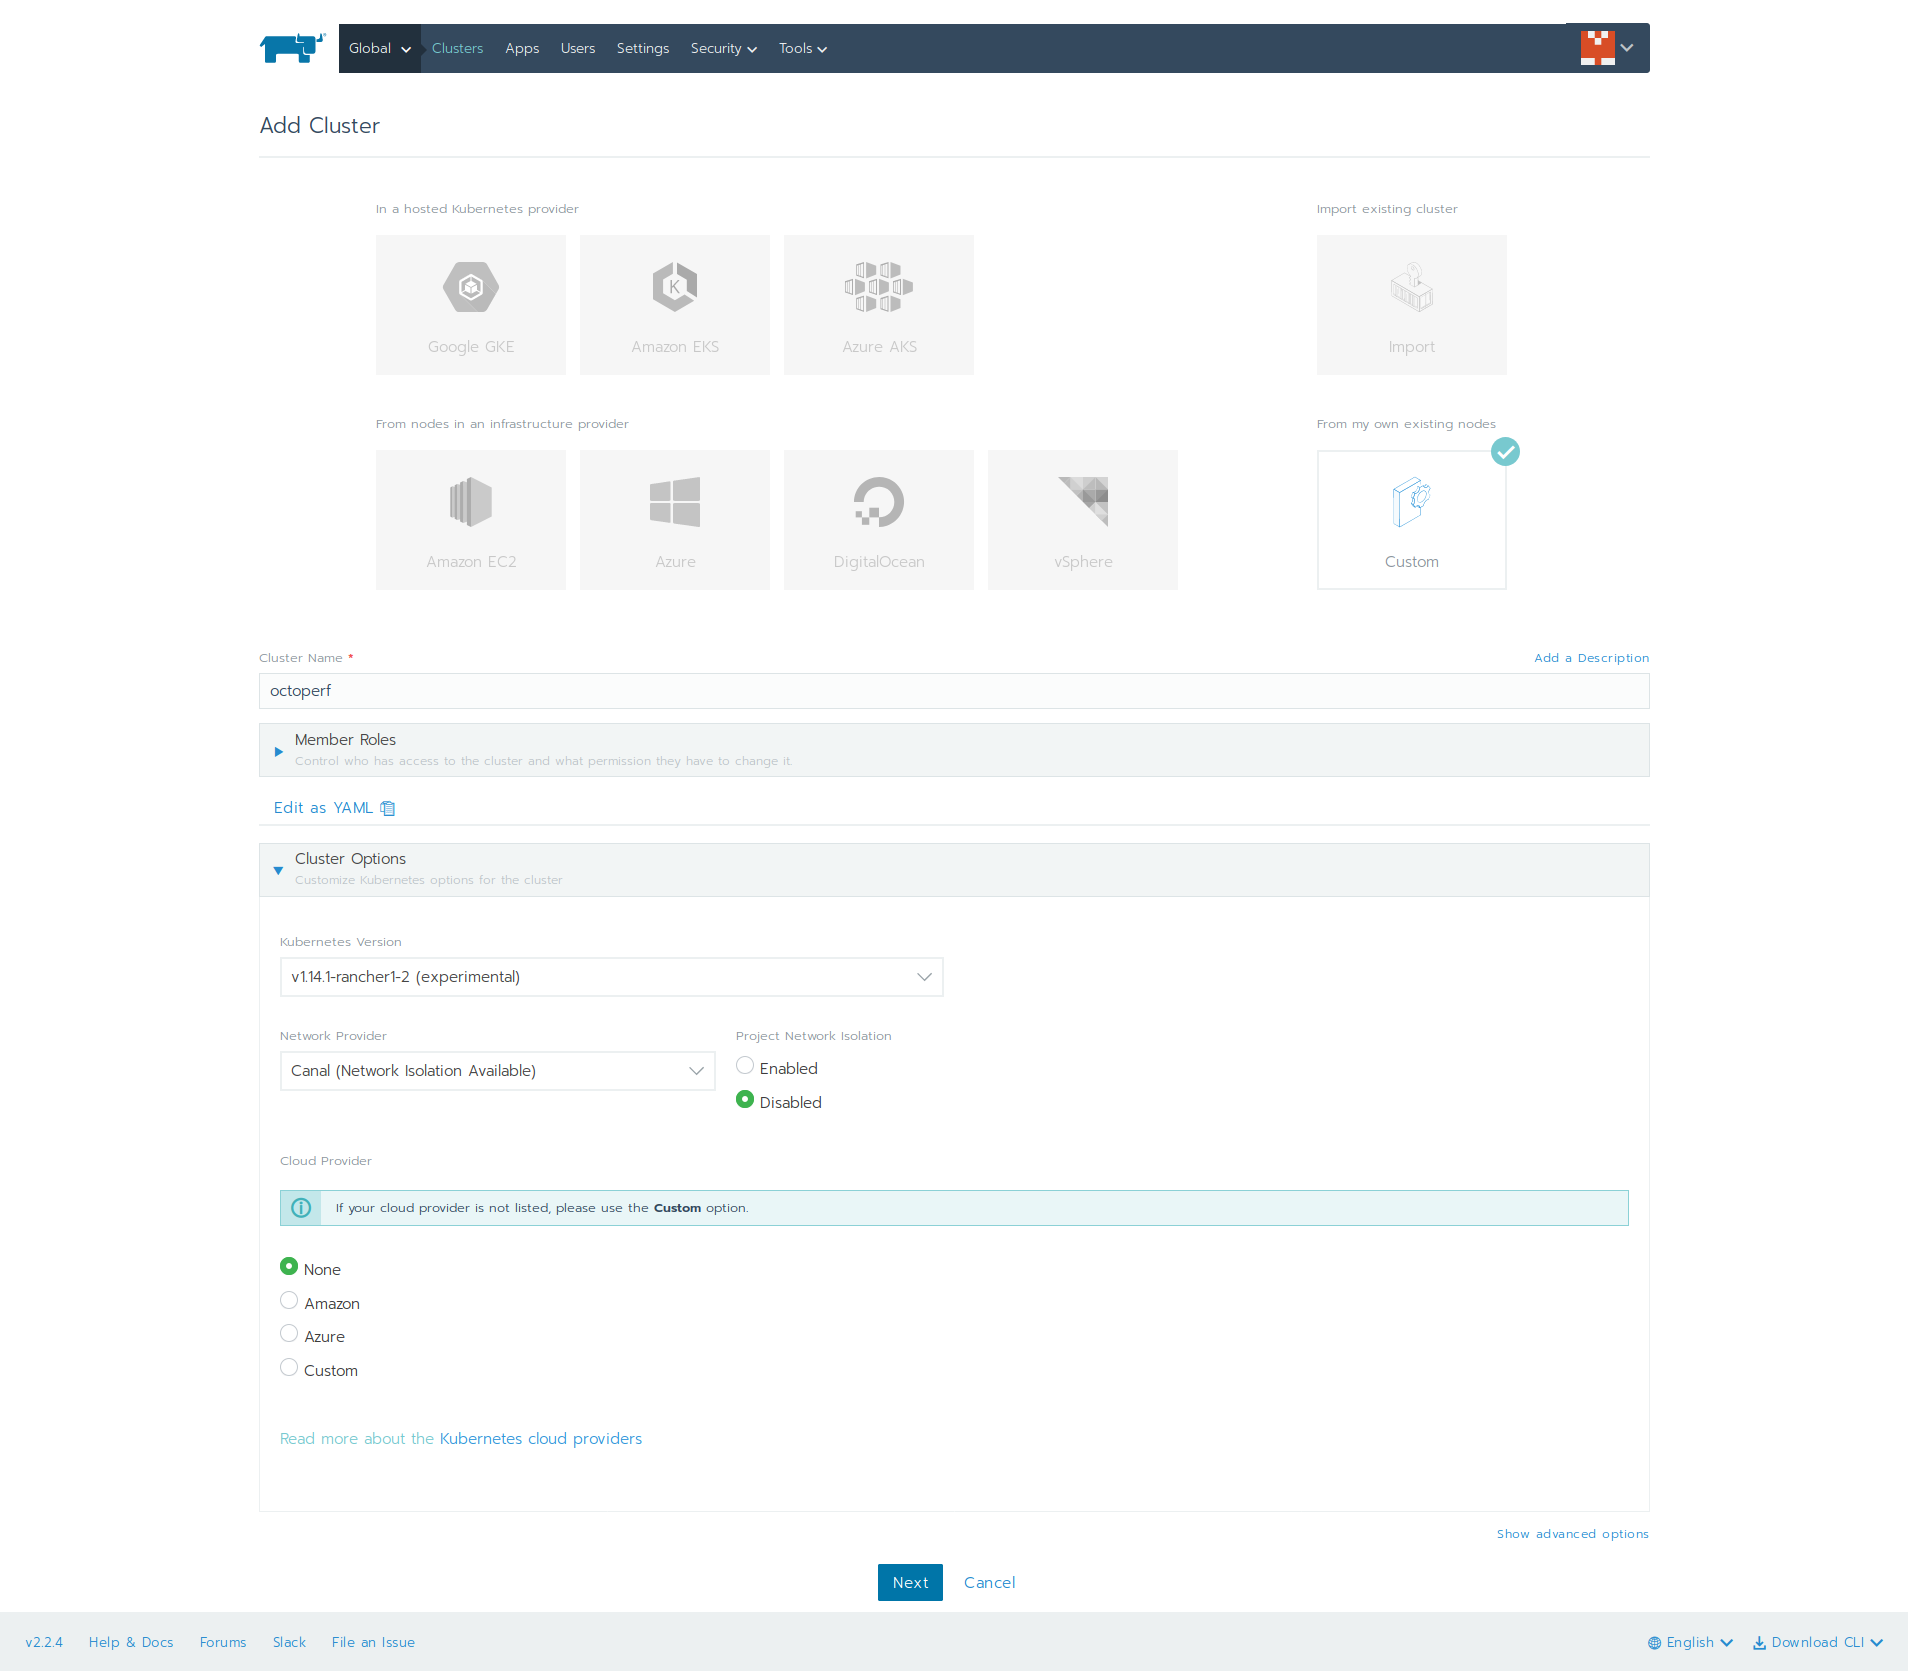 Custom Kubernetes Cluster
Click on Create Cluster button, then:
- Select
Customflavor, - In cluster name, enter
octoperf, - In cluster options, select Kubernetes version
v1.14.1-rancher-1-2, - In
Network Provider, leave asCanal, - In
Cloud Provider, lease asNone.
Then, click on Next button. On the next screen:
- Select Node options
etcd,Control PlaneandWorker. No other option is required (like node public ip or node name) as those are detected automatically, - Copy the command-line provided by Rancher and run it on each node:
root@rancher-node-1:~# sudo docker run -d --privileged --restart=unless-stopped --net=host -v /etc/kubernetes:/etc/kubernetes -v /var/run:/var/run rancher/rancher-agent:v2.2.4 --server https://165.22.24.244 --token dh9whpwjgt4ppm92r7xpjfn4s7wrhrgbk8xz29xphg6zmbwgk22l95 --ca-checksum bddf7e0dd7057ac3f36d751fb27e745837dc1b768447677500ba0b675118b0a7 --etcd --controlplane --worker
Unable to find image 'rancher/rancher-agent:v2.2.4' locally
v2.2.4: Pulling from rancher/rancher-agent
...
It may take several minutes until the nodes join the cluster. Rancher automatically setups Kubernetes along with networking connectivity on all nodes.
The cluster of 3 nodes is now ready! The next phase consists of deploying each workload.
Elasticsearch Workload
Topology
Elasticsearch will be deployed using 3 workloads:
es-1: elasticsearch master + data node running onrancher-node-1,es-2: elasticsearch master + data node running onrancher-node-2,- and
es-3: elasticsearch master + data node running onrancher-node-3.
Each elasticsearch container will use a persistent volume mapped to the node local directory /root/elasticsearch.
Also, each elasticsearch container will have its own name along with the shared configuration stored in a config map.
Persistent Volume
First, let's create the elasticsearch directory on each rancher node:
root@rancher-node-1:~# pwd
/root
root@rancher-node-1:~# mkdir elasticsearch
root@rancher-node-1:~# chmod 777 elasticsearch/
root@rancher-node-1:~#
Now we have a /root/elasticsearch writeable directory on each rancher node. We need to configure this directory as a volume within Rancher.
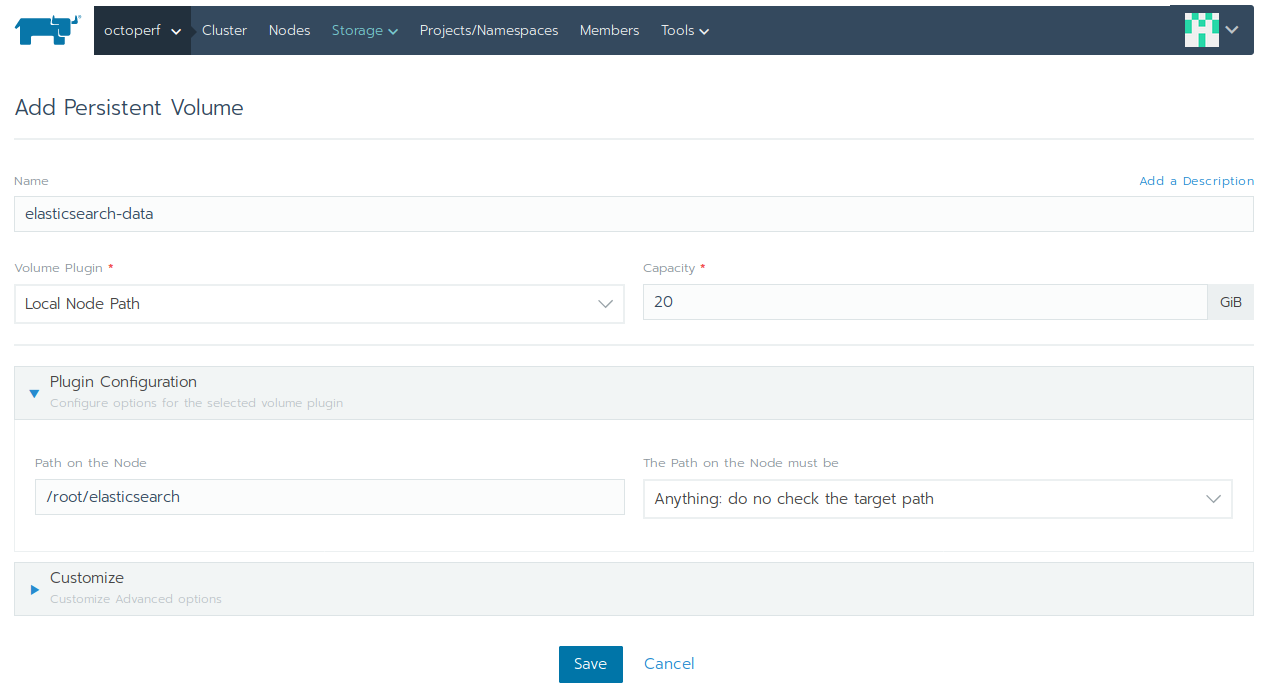
The Elasticsearch persistent volume is designed to house the elasticsearch data files:
- In Rancher UI, click on
octoperfcluster, then selectStorage > Persistent Volumesmenu, - Select
Local Node Pathvolume plugin, - Set at least
20GiBof space, - In plugin configuration, set
/root/elasticsearchpath on the node, and the path on the node myst beAnything: do not check the target path, - Click on
Saveto create the persistent volume.

Next, we need to add this volume to the Default project:
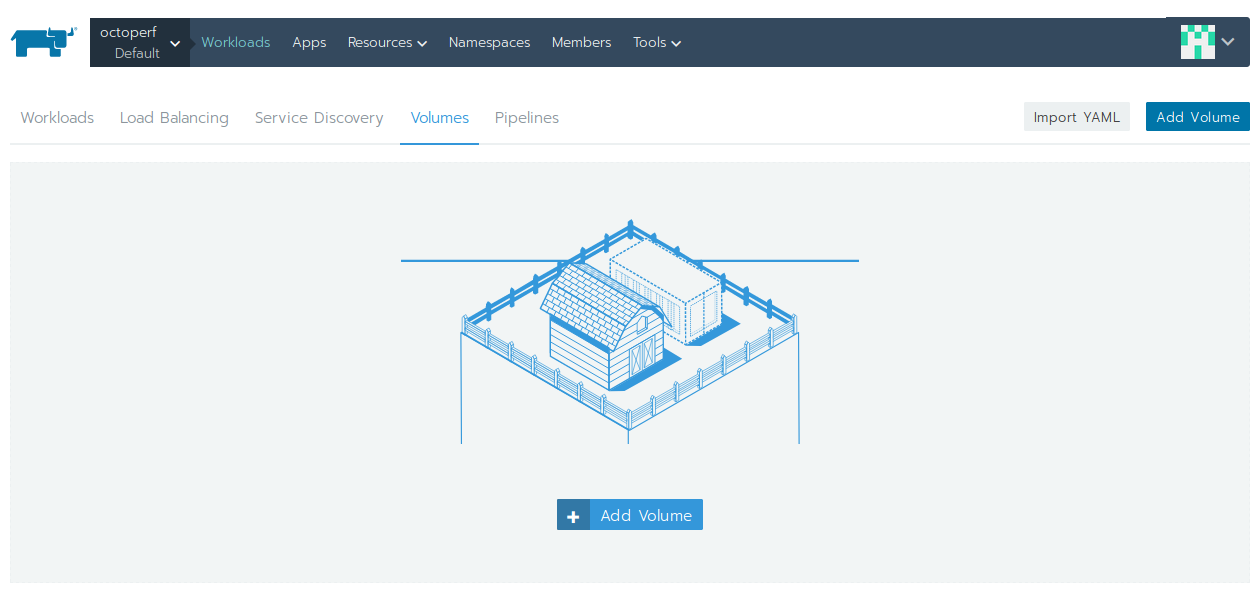
- Click on
octoperf > Defaultproject in top left menu in Rancher UI, - Click on
Workloadsin top menu, - Then select
Volumesin sub-menu, - Click on
Add Volume, - Enter
elasticsearch-dataas name and selectelasticsearch-datapersistent volume, - Click on
Create.

The data volume is now ready to be used by the Elasticsearch workload we're going to configure.
Config Map
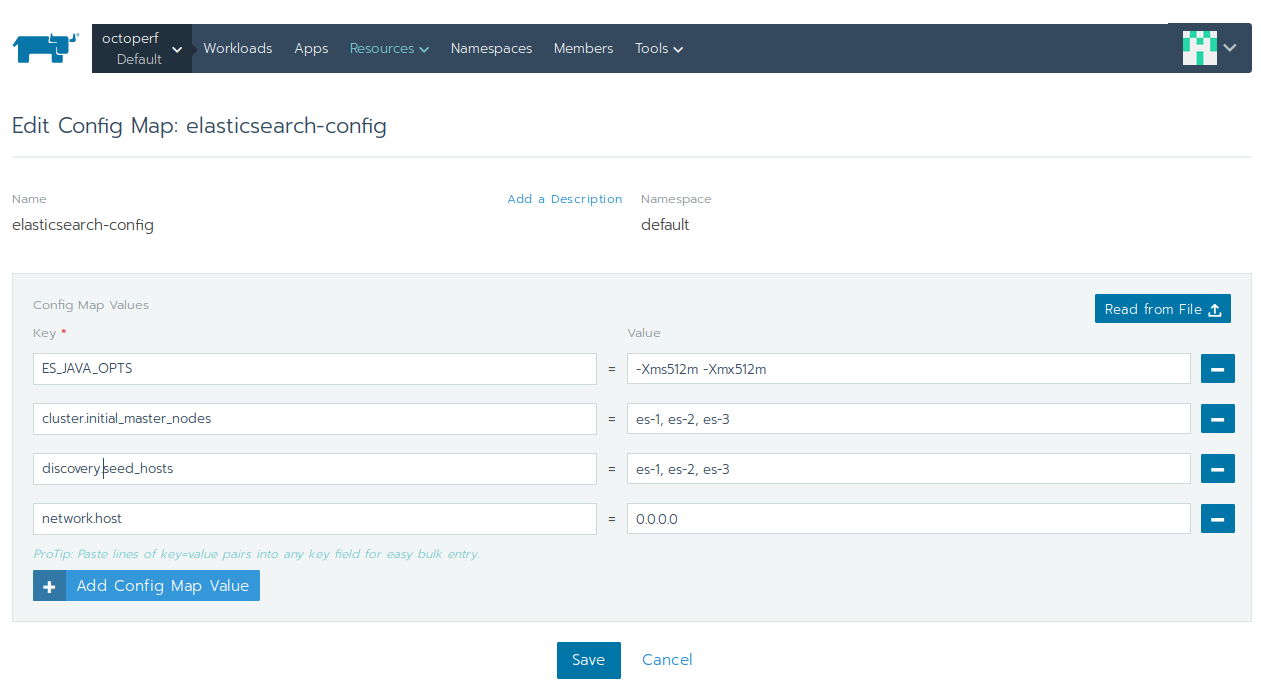
Elasticsearch config map is containing the configuration settings shared by all the elasticsearch nodes:
ES_JAVA_OPTS:-Xms512m -Xmx512m,cluster.initial_master_nodes:es-1, es-2, es-3,discovery.seed_hosts:es-1, es-2, es-3,network.host:0.0.0.0.
That way, we will have a cluster of 3 elasticsearch nodes, each master-eligible and storing data. Now, let's launch the workloads.
Workloads
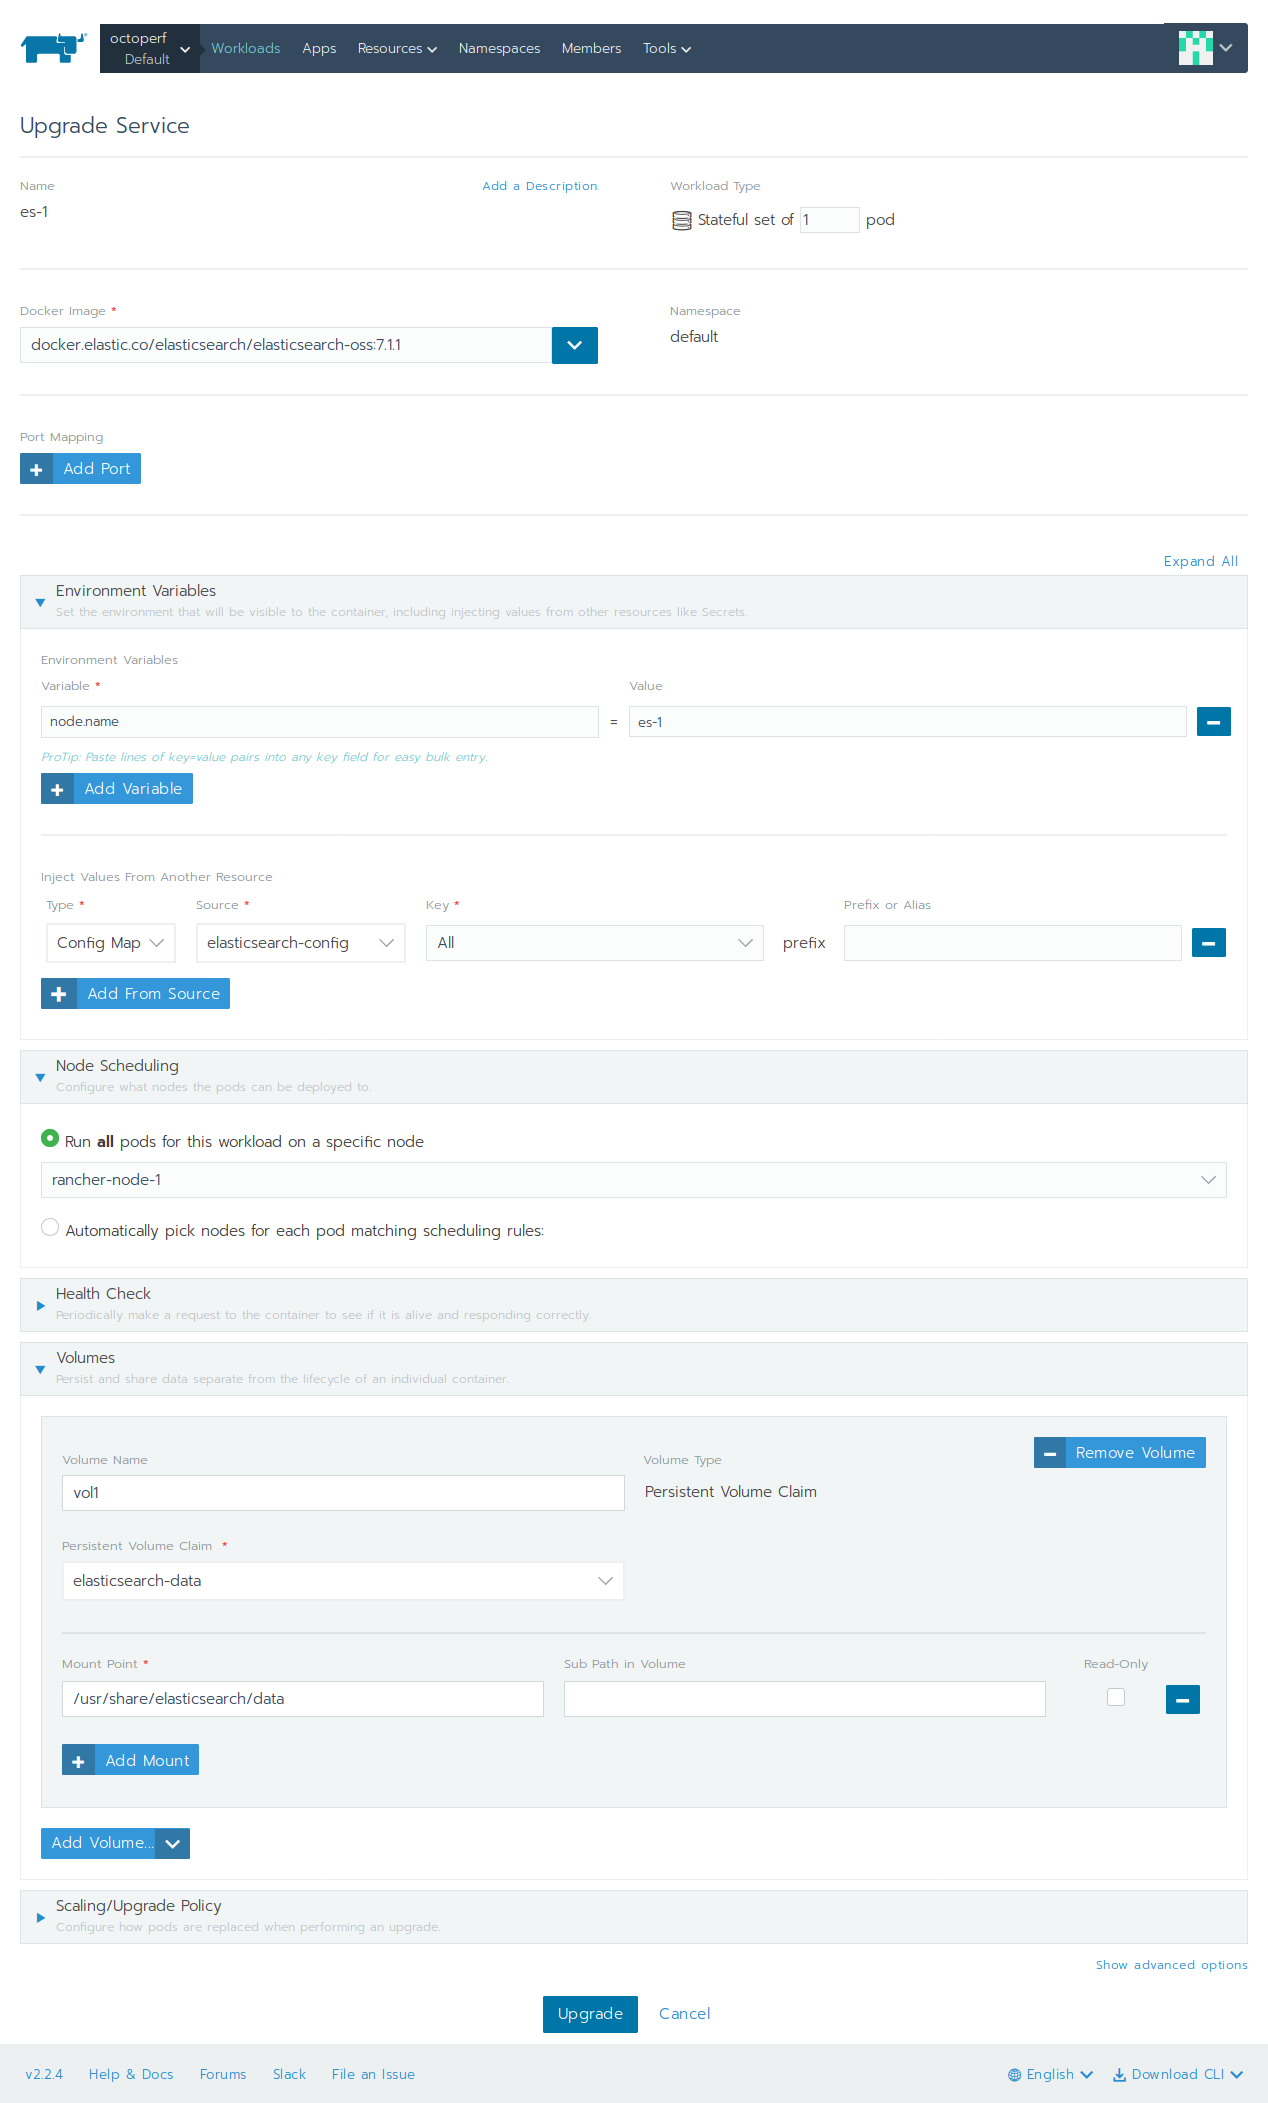
Each Elasticsearch container is launched in a separate workload because each has a unique node.name. Repeat the following procedure for es-1, es-2 and es-3:
- Select
Defaultproject insideoctoperfcluster, - Click on
Workloads, then click onCreate, - Name:
es-X(where X is 1, 2 then 3), - Workload type:
Stateful Set of 1 pod, - Docker image:
docker.elastic.co/elasticsearch/elasticsearch-oss:7.1.1, (version may vary depending on OctoPerf On-Premise Infra version being launched) - Environment variables: add
node.namewith valuees-X, (replaceXby relevant number, here it'ses-1). Click onAdd from sourcethen selectConfig Map,elasticsearch-configconfig map, - Node Scheduling: select
rancher-node-x(where X matches thees-Xvalue; Example:rancher-node-1), - Volumes: click on
Add Volume, then selectPersistent Volume Claimand chooseelasticsearch-datavolume. Set/usr/share/elasticsearch/dataasMount Point, - Click on
Launchto deploy workload.
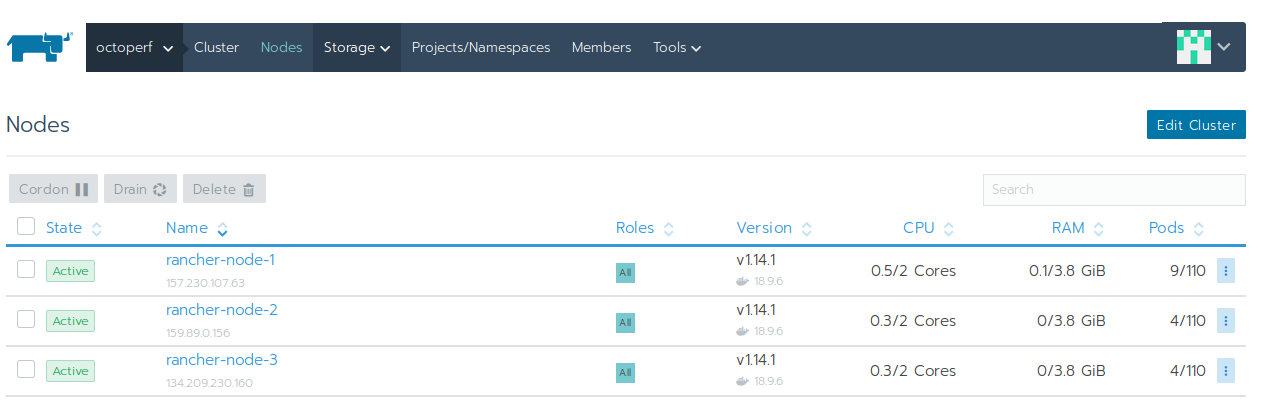
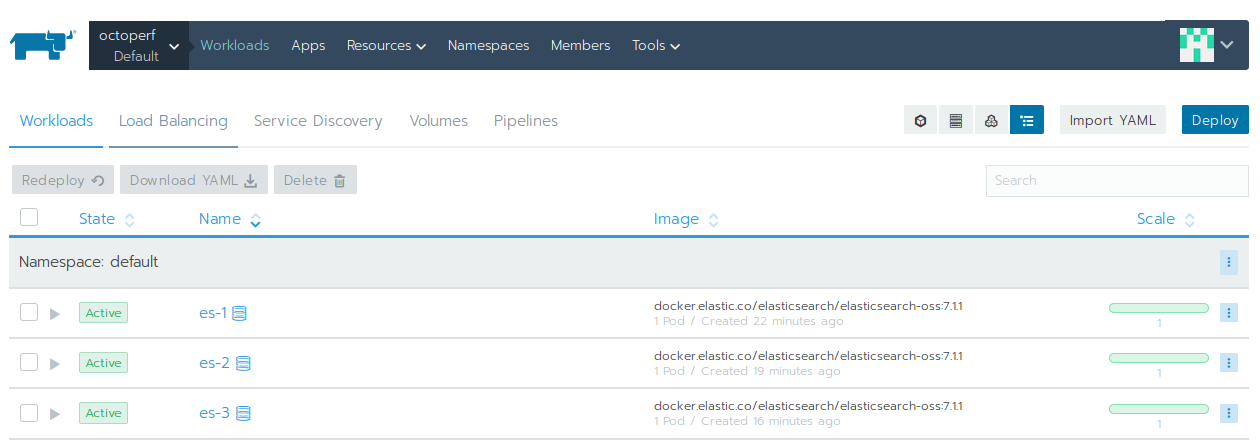 All 3 nodes are up and running
Once es-1, es-2 and es-3 workload are deployed, the elasticsearch cluster should stabilise and become operational. You can check this by Executing Shell inside one of the workload pods:
[root@es-1-0 elasticsearch]# curl localhost:9200/_cat/nodes
10.42.1.3  13 91 5 0.15 0.11 0.16 mdi - es-3
10.42.2.4  11 93 6 0.23 0.23 0.30 mdi - es-2
10.42.0.11 22 85 6 0.05 0.21 0.35 mdi * es-1
[root@es-1-0 elasticsearch]#
Service Discovery
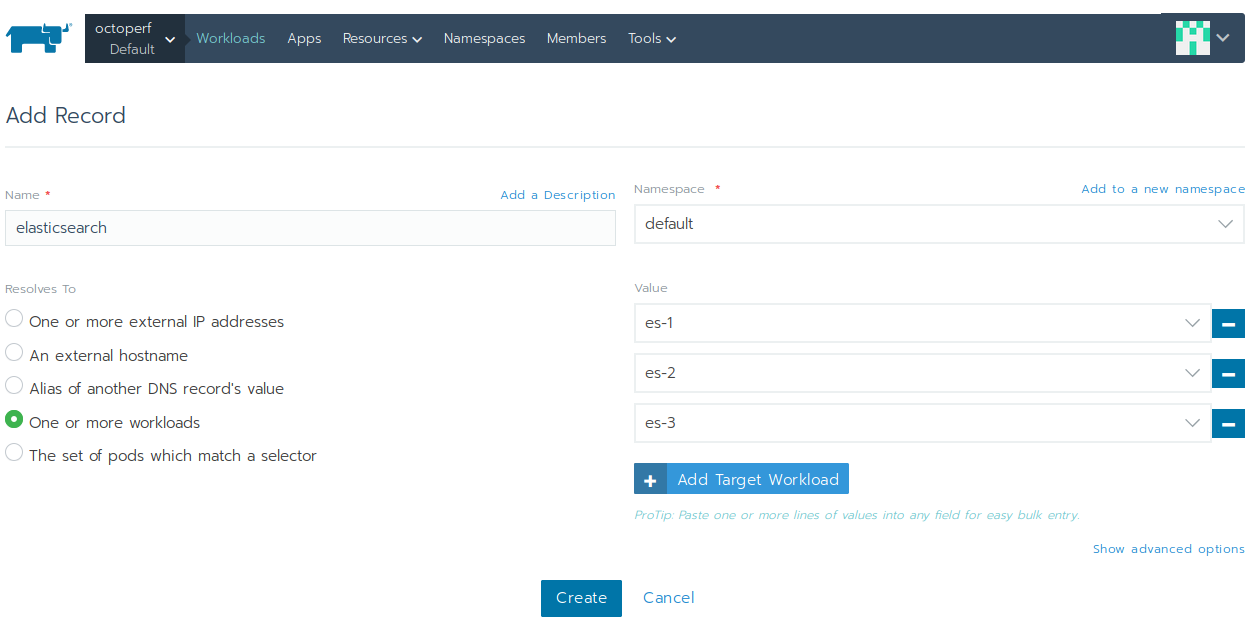
The backend is connecting to Elasticsearch through its hostname. The thing is, we don't want to hardcode any of the es-X nodes hostname: it may fail to connect if one of the nodes is failing. The solution is to define a Service Discovery entry:
- Select
Defaultproject insideoctoperfcluster, - Click on
Service Discovery, then click onAdd Record, - Name:
elasticsearch, - Resolves To:
One or more workloads, - Namespace:
default, - Target Workloads: add
es-1,es-2andes-3.
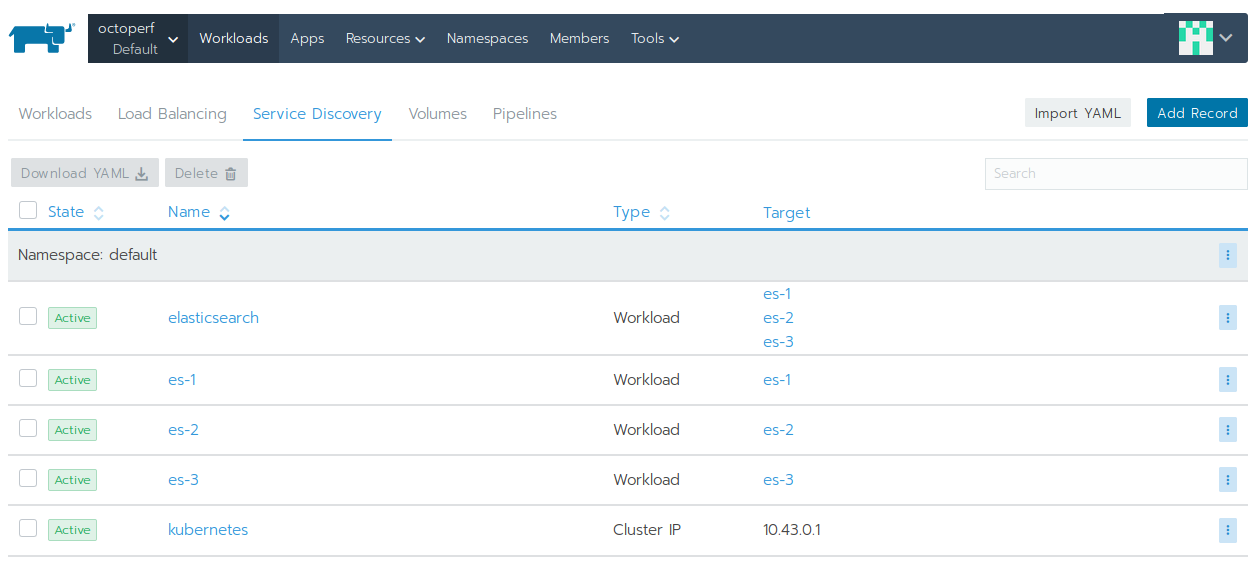
That means: a DNS resolution of hostname elasticsearch is the IPs of all three nodes.
On-Premise Infra
The On-Premise Infra backend server connects to Elasticsearch database and exposes an API which can be consumed by OctoPerf web UI.
This tutorial supposes you have already setup an Amazon S3 bucket for resources storage. The backend is going to run on all nodes in High availability so the S3 bucket is needed to share the files between all the backends.
Config Map
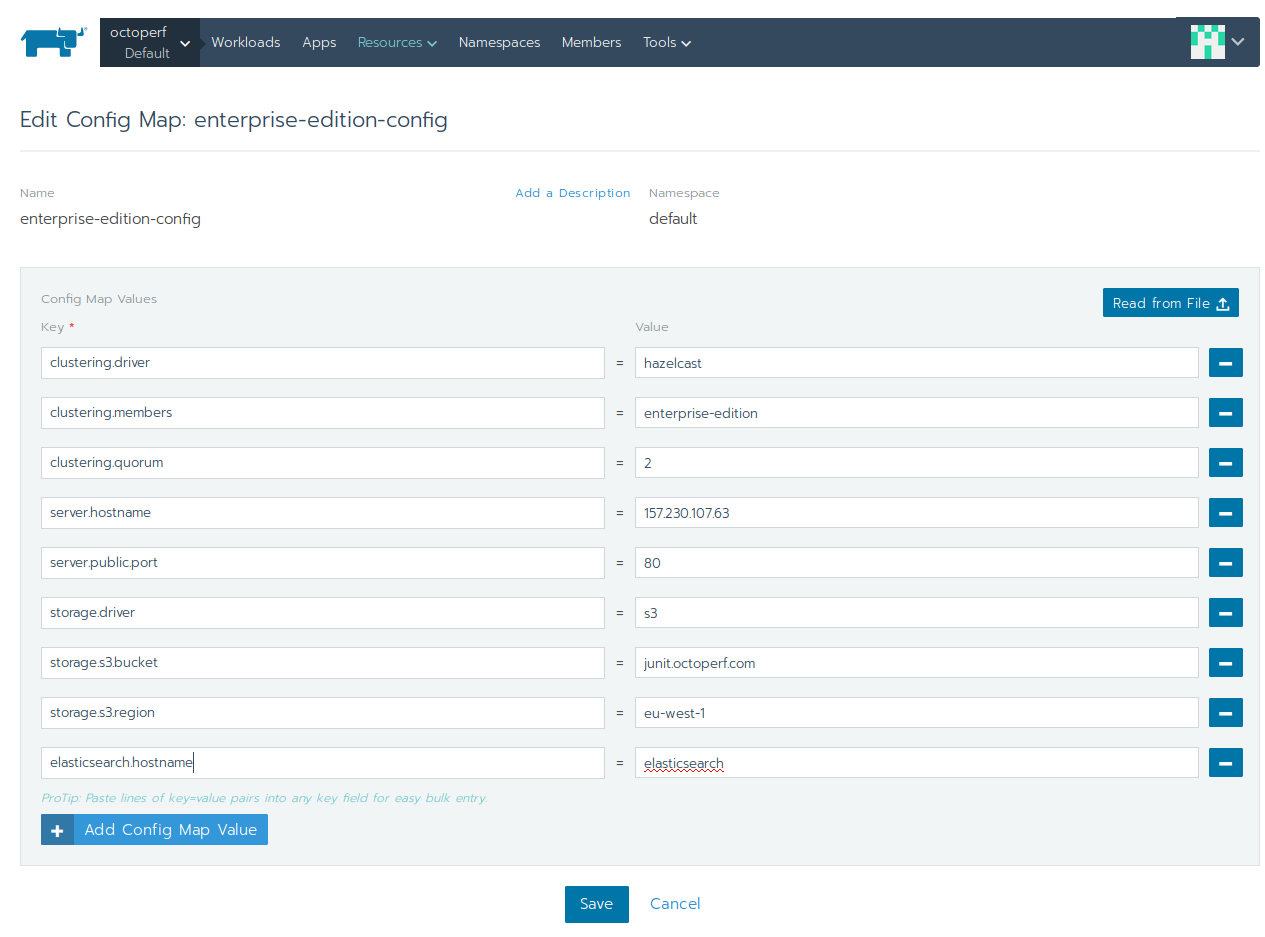
The config map is containing the configuration shared among all backend containers:
- clustering.driver:
hazelcast, - clustering.members:
enterprise-edition, (workload DNS entry) - clustering.quorum:
2, as we have a cluster of 3 nodes, - storage.driver:
s3, because resources (like project files) are stored on s3, - storage.s3.region:
eu-west-1in this case (because our S3 bucket is in Ireland), - storage.s3.bucket:
YOUR_S3_BUCKET(we usedjunit.octoperf.comhere), - server.hostname:
IP or DNS entry(the IP of one of the 3 nodes in our case; the load balancer is going to run on all the nodes) - elasticsearch.hostname:
elasticsearch(the service discovery entry we previously created) - server.public.port:
80, because we're going to serve the API in plain text (no SSL in this setup).
For more information regarding these settings, please refer to Configuration.
Secret
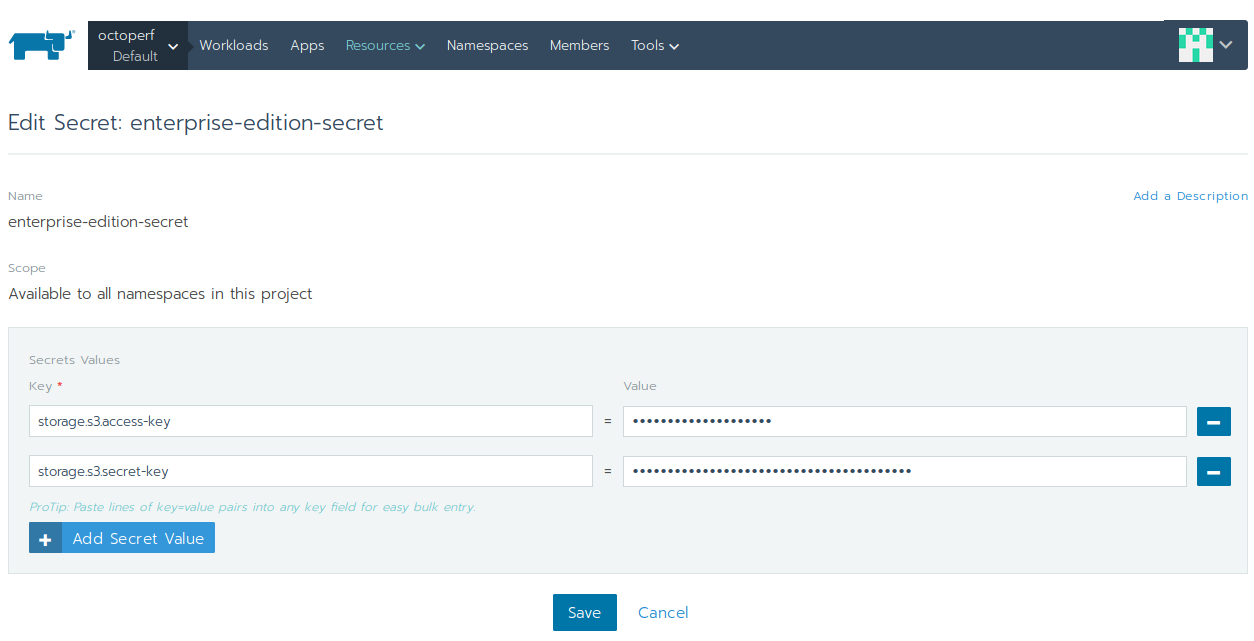
The storage.s3.access-key and storage.s3.secret-key aws keys are provided by a Secret:
- Click on
Resources > Secrets, - Create a new secret named
enterprise-edition-secret, - Add
storage.s3.access-keyandstorage.s3.secret-keywhich point to an IAM user which has only the permission to access the given s3 bucket. Here is an example IAM policy which gives access tojunit.octoperf.coms3 bucket:
{
    "Version": "2012-10-17",
    "Statement": [
        {
            "Sid": "Stmt1427454857000",
            "Effect": "Allow",
            "Action": [
                "s3:Get*",
                "s3:List*",
                "s3:Put*",
                "s3:Delete*"
            ],
            "Resource": [
                "arn:aws:s3:::junit.octoperf.com",
                "arn:aws:s3:::junit.octoperf.com/*"
            ]
        }
    ]
}
Workload
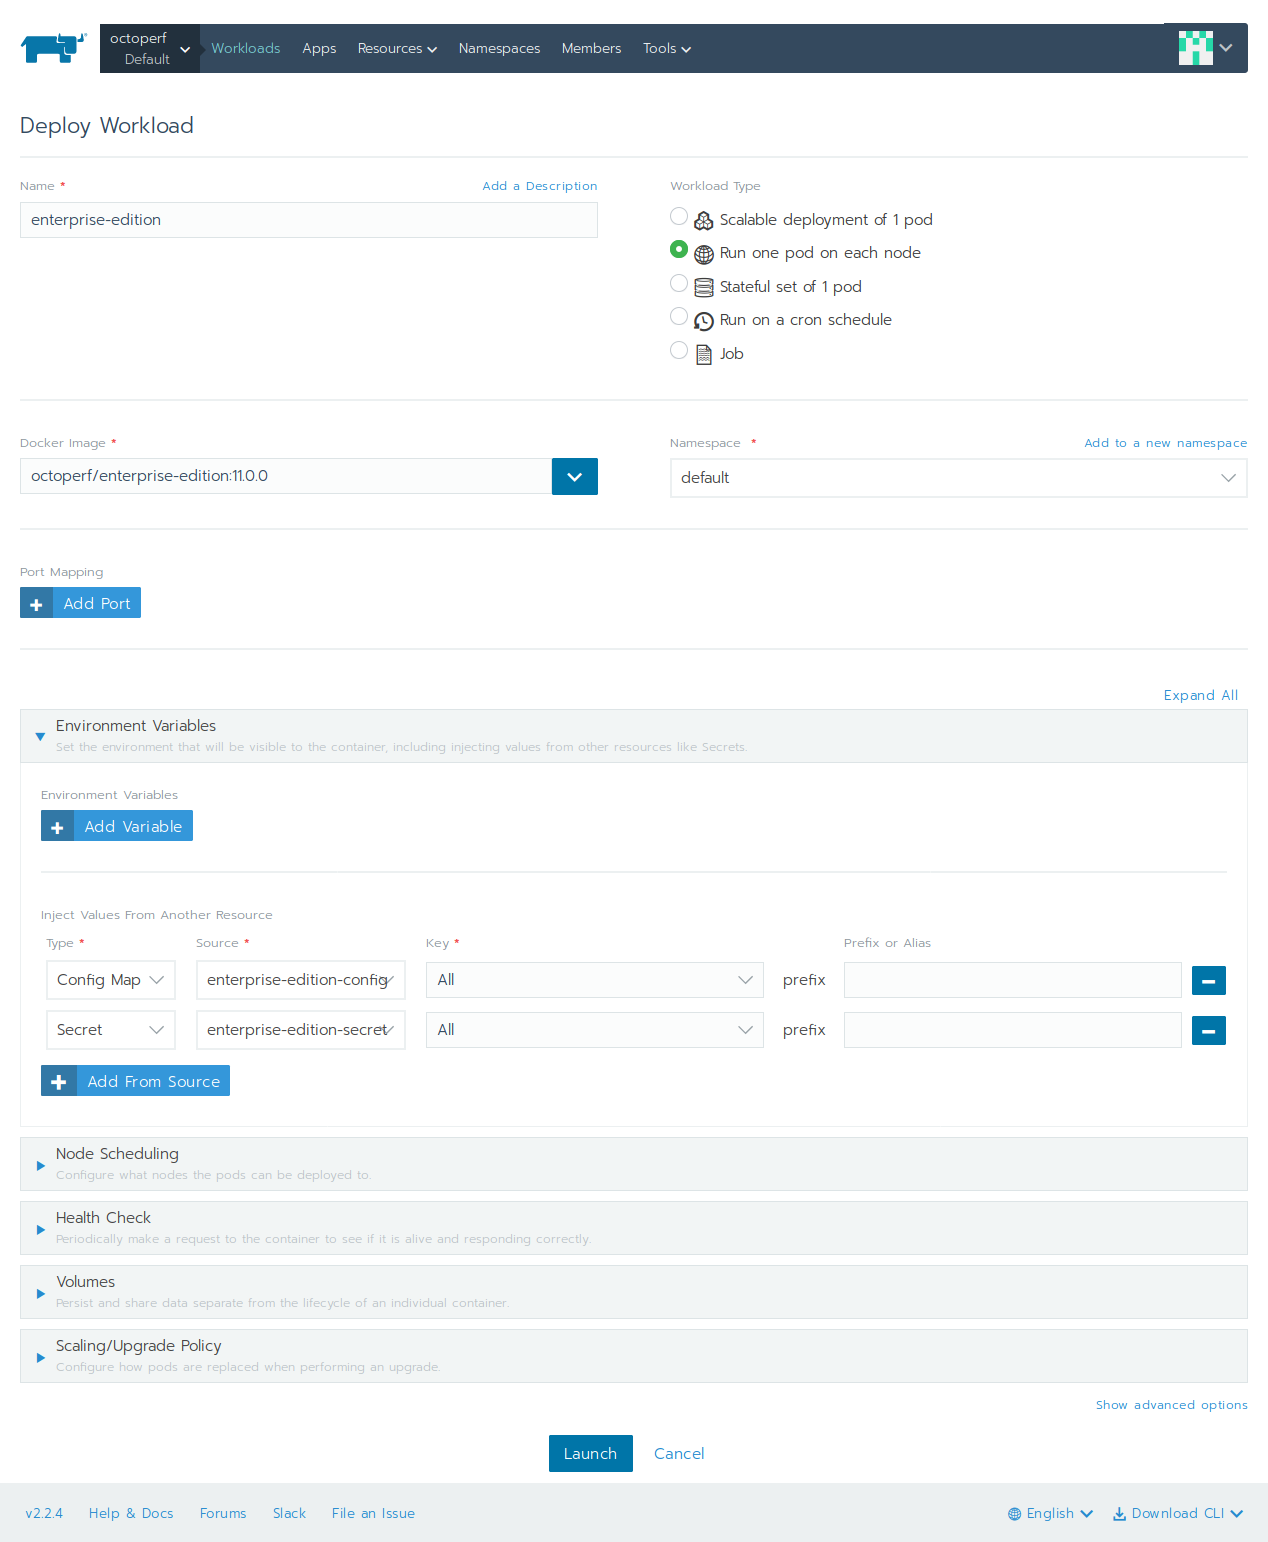
Let's now deploy the workload which runs the server on all the nodes:
- Click on
WorkloadsthenDeploy, - Name:
enterprise-edition, - Workload type:
Run one pod on each node, - Docker image:
octoperf/enterprise-edition:11.0.0(replace11.0.0by latest version available), - Namespace:
default, - Environment variables: import both
enterprise-edition-configconfig map andenterprise-edition-secretsecret, - Click on
Launch.
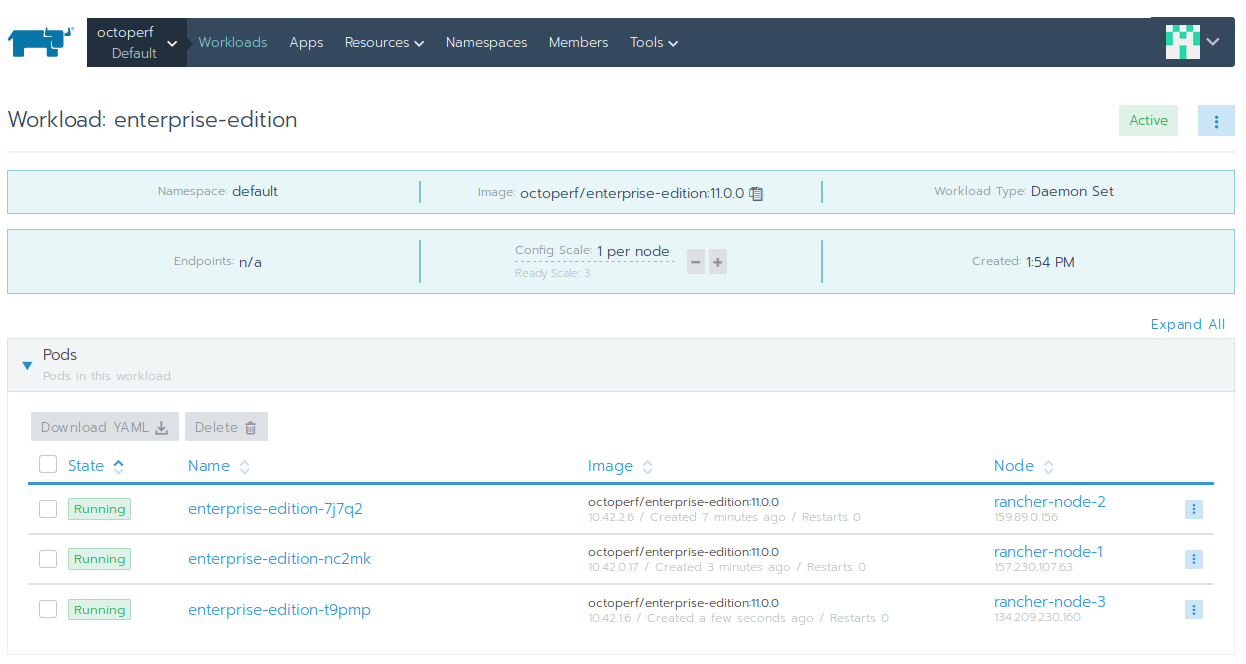
You should see 3 pods, each running on a separate host. All those pods are connected to each other by using Hazelcast to form a cluster.
Those 3 containers are acting in a master / slave configuration:
- One node is elected as master and takes care of scheduling the load tests,
- Should the master fail, another node takes over,
- Should there be a network partition, the partition having at least
2nodes (as stated by the quorum setting) stays operational.
On-Premise UI
The frontend is a tiny Nginx server running inside a container to serve the statically generated JS and html files.
Workload
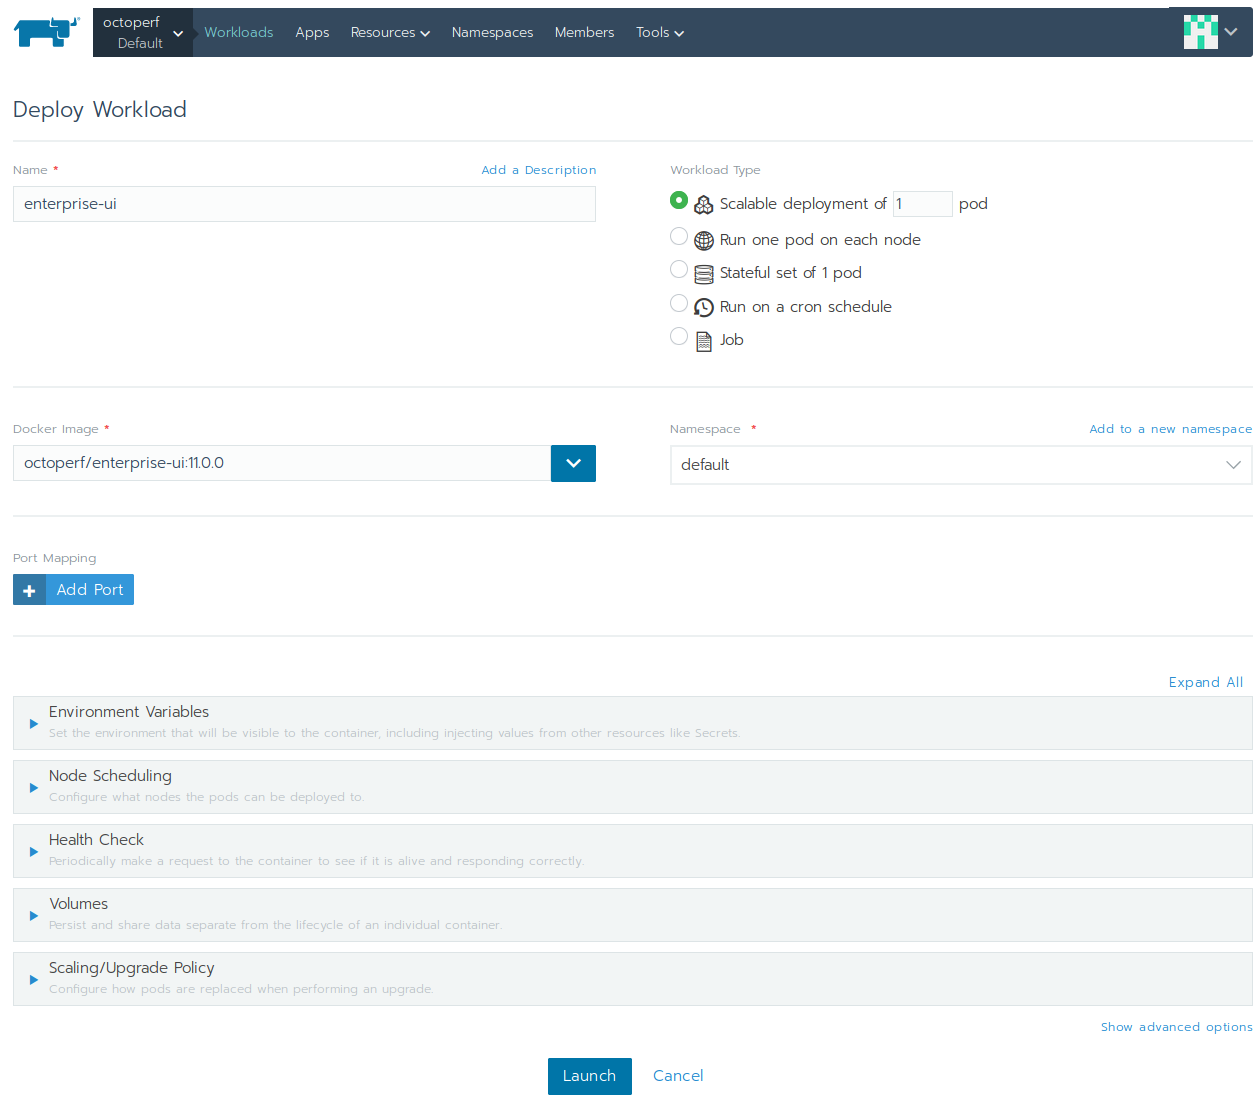
Let's deploy the frontend container. In this case, a single container is plenty enough to serve the frontend. The workload is pretty simple:
- Click on
WorkloadsthenDeploy, - Name:
enterprise-ui, - Docker Image:
octoperf/enterprise-ui:11.0.0, (adjust version to the latest available) - Workload Type: scalable deployment of 1 pod.
No other settings are required. the container can run on any node. Kubernetes will take care of rescheduling it to another node if it fails.
On-Premise Documentation
The frontend is a tiny Nginx server running inside a container to serve the statically generated documentation.
Workload
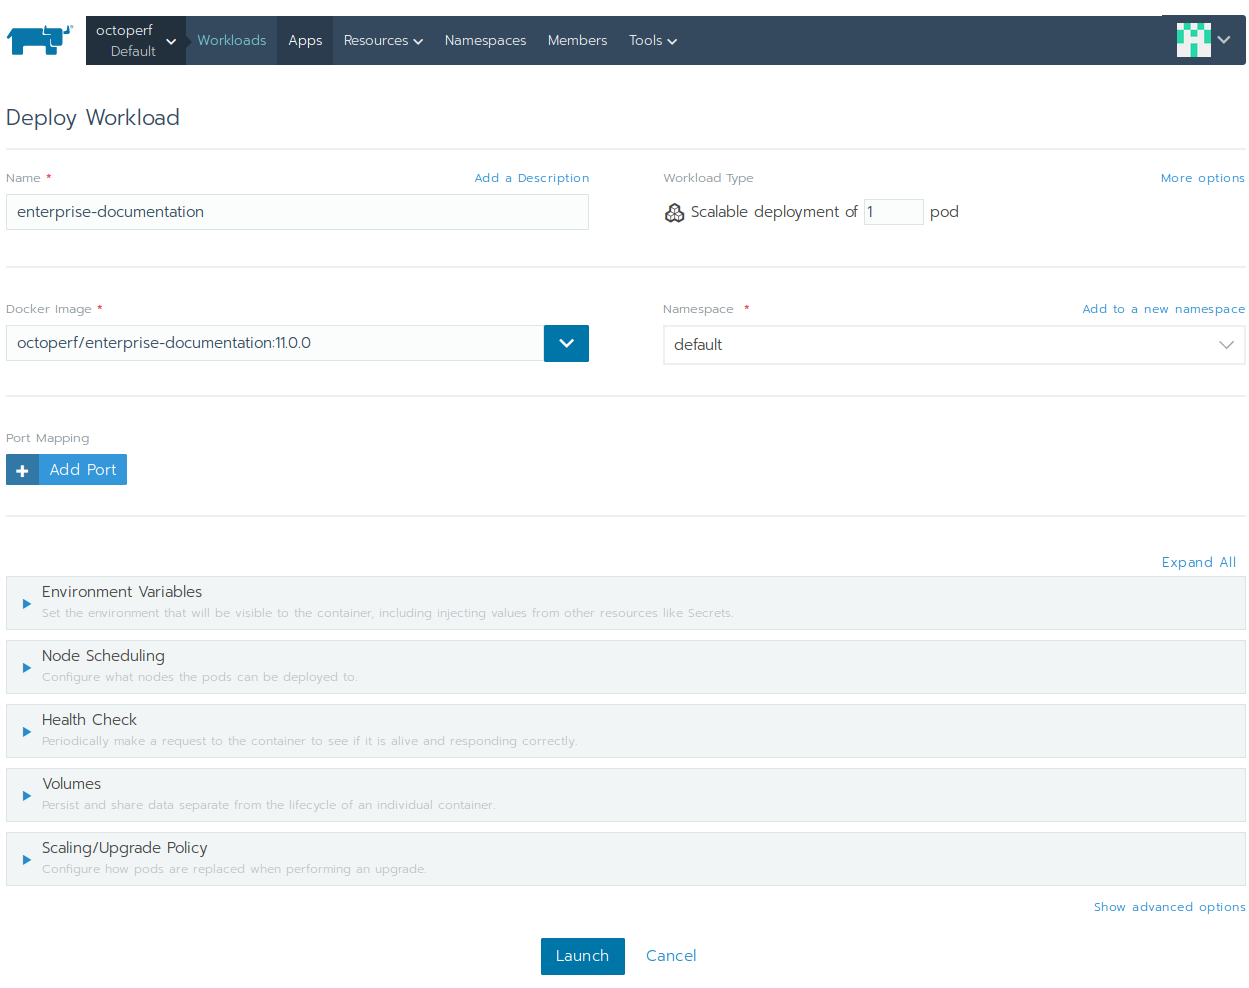
Let's deploy the frontend container. In this case, a single container is plenty enough to serve the frontend. The workload is pretty simple:
- Name:
enterprise-documentation, - Docker Image:
octoperf/enterprise-documentation:11.0.0, (adjust version to the latest available) - Workload Type: scalable deployment of 1 pod.
No other settings are required. the container can run on any node. Kubernetes will take care of rescheduling it to another node if it fails.
Load Balancing

The final step is to expose the frontend, documentation and backend workloads through a ingress load balancer:
- Click on
Load BalancingthenAdd Ingress, - Name:
load-balancer, - Rules: set to use generated
nip.iohostname.

Then define 3 workload rules:
/docwhich points toenterprise-documentationon port80,/appwhich points toenterprise-uion port80,/which points toenterprise-editionon port8090.
Click on Save to create the ingress load balancer.
Accessing the Application
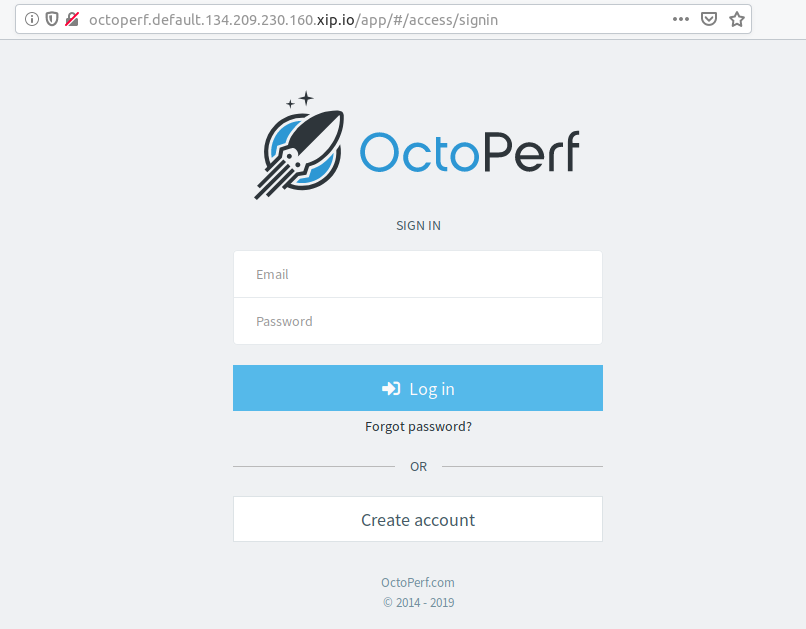
Now you can browse to http://octoperf.default.XXX.XXX.XXX.XXX.nip.io (click on the link from the ingress view to open it automatically from Rancher UI).
Create an Account
OctoPerf EE comes completely empty. You need to create an account and register a load generator (computer used to generate the load) to be able to run load tests:
- Signup and create a new account,
- Create an On-Premise Provider: providers are groups of load generators,
- And register an On-Premise Agent within the previously created On-Premise Provider.
Congratulations! The setup is now complete.