Files Manager
This page allows you to manage files:
- CSV variables content,
- POST Http request bodies,
- Kerberos configuration files,
- .sh scripts,
hostsfile to be be appended at the end of the load generator’s hosts file (during validation and runtime).- JMeter Plugins
jarfiles.
Files list

The Files page is basically a list and as such it features all the usual possibilities as described in the dedicated section about lists.
The Current and maximum file size for this project are displayed on top, these settings can be changed through the configuration files of your On premise Infra.
Note
Files might be deployed to different folders prior to the execution. You can find out more on the test startup process page.
Several unique actions are available when you place your mouse over a File in the list:
View File

Most files can be previewed directly in the interface (excluding certain types such as compressed archives).
Tip
For large text files, only the first 1000 lines are shown. You can always download the file to view or edit it in full.
Edit File

Text-based files (detected from their filename) can be edited directly in the editor. If the file exceeds the size limit, download it, make your changes, and re-upload it. Uploading a file with the same name will replace the existing version.
Tip
Only relatively small files can be edited inline (the current limit is 1 MB).
Download File

Upload files

Click Upload new files or drag and drop files in the bottom panel to upload one or several files into your project.
Files with the exact same name (case sensitive) will override the existing files.
Info
You can upload Zipped files that OctoPerf will automatically unzip after upload by using the .unzipme.zip suffix.
Script Examples
Two types of sh scripts can be uploaded in the Files section and be automatically executed by OctoPerf:
before-test.sh:bashscript (using#!/usr/bin/env bashshebang) to run before the test is being executed. Runs on each load generator,after-test.sh:bashscript (using#!/usr/bin/env bashshebang) to run after the test is being executed. Runs on each load generator.
Note
More information on when these scripts are triggered can be found in the test startup process page.
JDBC configurations
Remove outdated driver jar
The following script removes the old mongodb driver from JMeter lib/ folder:
#!/usr/bin/env bash
rm -f "${JMETER_HOME}/lib/mongo-java-driver-2.11.3.jar"
It can be convenient to use if some JAR files you need conflict with the existing JMeter JAR files.
Change timezone
The underlying JDBC driver may have trouble dealing with dates comparisons if your database is using a different timezone than UTC.
The following script will change OctoPerf's agent timezone to match yours:
#!/usr/bin/env bash
export JVM_ARGS="${JVM_ARGS} -Duser.timezone=GMT+2"
We encountered this issue with Postgresql JDBC driver.
Edit JMeter settings
Properties
Scripts can also be used to add JMeter properties before the tests starts. Below are a few use cases:
HTTP retries
You can add retries on HTTP connections to get rid of connection reset messages:
#!/usr/bin/env bash

USER_PROPS=${JMETER_HOME}/bin/user.properties

echo "httpclient4.retrycount=10"  >> ${USER_PROPS}
echo "httpclient4.idletimeout=120"  >> ${USER_PROPS}
Warning
Increasing retry and timeout may remove the issue from the test results but it does not actually fix it. Connectivity issues during a load test strongly indicates you reached a bottleneck, try to investigate.
SSL reuse and share
In this example we tell all users to reuse and share the SSL context of the first user connecting:
#!/usr/bin/env bash

SYSTEM_PROPS=${JMETER_HOME}/bin/system.properties
echo "https.sessioncontext.shared=true"  >> ${SYSTEM_PROPS}
echo "https.use.cached.ssl.context=true"  >> ${SYSTEM_PROPS}
echo "httpclient.reset_state_on_thread_group_iteration=false"  >> ${SYSTEM_PROPS}
Warning
SSL negociation time consumes a lot of server resources and usually represents up to 300-400 ms. Each individual user connecting to your servers will go through it and by default OctoPerf simulates it in a realistic way. With these settings you are bypassing it and thus your servers will not be tested under real conditions. Your response times will also be made artificially smaller.
Edit keep alive TTL
The default keep alive TTL in JMeter is 60 seconds. Some applications might be configured to consider the HTTP connection expired after less than 60 seconds of inactivity.
In that case JMeter might try to reuse an expired connection, thus getting an error. To prevent this, you can configure JMeter to consider the HTTP connection expired after a shorter period of inactivity:
#!/usr/bin/env bash

USER_PROPS=${JMETER_HOME}/bin/user.properties

echo "httpclient4.time_to_live=1"  >> ${USER_PROPS}
Warning
Changing this setting will cause JMeter to create more connections than it usually would. Thus generating a different load to your servers. Make sure to only change it when you know for sure that the TTL must be lower.
Edit an existing user property
In case you want to edit a property that already exists, just adding it at the end of the file may not be enough.
This script example will remove a line from user.properties but it can be adapted to any situation:
#!/usr/bin/env bash

sed -e '/httpsampler.embedded_resources_use_md5=true/ s/^#*/#/' -i ${JMETER_HOME}/bin/user.properties
Log Garbage Collector Activity
This script allows you to log JMeter's Garbage Collector activity for further debugging when you suspect having memory issues.
#!/usr/bin/env bash
export JVM_ARGS="${JVM_ARGS} -verbose:gc -Xloggc:${JMETER_HOME}/gc.log"
echo ${JVM_ARGS}
#!/usr/bin/env bash
mv ${JMETER_HOME}/gc.log ${JMETER_HOME}/${HOST_NAME}.gc.log
uploadFile ${JMETER_HOME}/${HOST_NAME}.gc.log
The GC log files are then be available along with the JMeter logs in the report.
Disable TLS versions
This script allows you to force a particular version of TLS, and disable other versions at the same time. For this to work, an additional configuration file must be added to the Files menu.
#!/usr/bin/env bash
export JVM_ARGS="${JVM_ARGS} -Djava.security.properties=${JMETER_HOME}/resources/disabled_tlsv1.properties"
echo ${JVM_ARGS}
Disable SNI
This script allows you to disable Server Name Indication in java 7+. This is useful in order to fix the following exception: "handshake alert: unrecognized_name".
#!/usr/bin/env bash
SYS_PROPS=${JMETER_HOME}/bin/system.properties
echo "jsse.enableSNIExtension=false"  >> ${SYS_PROPS}
Activate JMeter debug logs
This script allows you to override the log4j2.xml file of JMeter inside OctoPerf before the test. Note that you must provide the edited log4j2.xml inside the Files menu for this to work.
#!/usr/bin/env bash
cp ${JMETER_HOME}/resources/log4j2.xml ${JMETER_HOME}/bin/log4j2.xml
Custom certificate
This script will be executed just before the test starts and right after all load generators are created.
It is a good way to execute a configuration Like editing the system.properties file.
Some properties must be in this file instead of the user.properties file that you can edit through runtime properties.
JKS certificate
In this example we configured JMeter to use a custom keystore so that our virtual users will send a specific JKS certificate:
#!/usr/bin/env bash

SYSTEM_PROPS=${JMETER_HOME}/bin/system.properties

echo "javax.net.ssl.keyStore=${JMETER_HOME}/resources/myCert.jks"  >> ${SYSTEM_PROPS}
echo ""  >> ${SYSTEM_PROPS}
echo "javax.net.ssl.keyStorePassword=myPassword"  >> ${SYSTEM_PROPS}
PFX Certificate
It works with PFX certificates as well you just need to specify the keystoreType:
#!/usr/bin/env bash

SYSTEM_PROPS=${JMETER_HOME}/bin/system.properties

echo "javax.net.ssl.keyStore=${JMETER_HOME}/resources/myCert.pfx"  >> ${SYSTEM_PROPS}
echo ""  >> ${SYSTEM_PROPS}
echo "javax.net.ssl.keyStorePassword=myPassword"  >> ${SYSTEM_PROPS}
echo ""  >> ${SYSTEM_PROPS}
echo "javax.net.ssl.keyStoreType=pkcs12"  >> ${SYSTEM_PROPS}
Use a different certificate per runtime profile
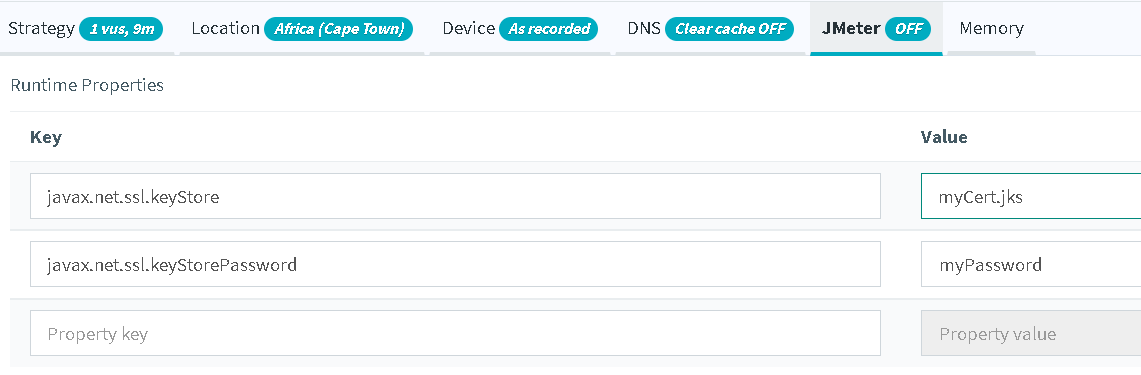
Since the before-test.sh file is the same for then entire test, it is sometimes difficult to provide a different value for each runtime profile inside a single test. To address that it is possible to use properties. The following script will use a property as defined on the runtime profile:
SYSTEM_PROPS=${JMETER_HOME}/bin/system.properties
local KEYSTORE=$(getProperty "${JMETER_USER_PROPERTIES}" "javax.net.ssl.keyStore")
local PASSWORD=$(getProperty "${JMETER_USER_PROPERTIES}" "javax.net.ssl.keyStorePassword")

echo "javax.net.ssl.keyStore=${JMETER_HOME}/resources/${KEYSTORE}"  >> ${SYSTEM_PROPS}
echo ""  >> ${SYSTEM_PROPS}
echo "javax.net.ssl.keyStorePassword=${PASSWORD}"  >> ${SYSTEM_PROPS}
Here's what the runtime profile looks like:
Use a certificate store with multiple certificates
It is possible for each virtual user to use a different certificate from a certificate store but some properties must be set in order to do that:
#!/usr/bin/env bash

SYSTEM_PROPS=${JMETER_HOME}/bin/system.properties
echo "javax.net.ssl.keyStore=${JMETER_HOME}/resources/keystore.jks"  >> ${SYSTEM_PROPS}
echo ""  >> ${SYSTEM_PROPS}
echo "javax.net.ssl.keyStorePassword=changeit"  >> ${SYSTEM_PROPS}

JMETER_PROPS=${JMETER_HOME}/bin/jmeter.properties
echo "https.keyStoreStartIndex=0"  >> ${JMETER_PROPS}
echo "https.keyStoreEndIndex=30"  >> ${JMETER_PROPS}
echo "https.keyStoreCertAliasVarName=${keystore}"  >> ${JMETER_PROPS}
echo "https.keyStorePreload=true"  >> ${JMETER_PROPS}
- keyStoreStartIndex : Index of first certificate to use,
- keyStoreEndIndex : Index of last certificate to use,
-1to use all certificates, - keyStoreCertAliasVarName : Leave empty to use certificates sequentially, or specify certificate alias to use through a variables (like a CSV variable),
- keyStorePreload : Should the certificate be preloaded.
Uploading a CSV to Test Logs
This script will be executed just before the test ends and all load generators are destroyed. It is a good way to execute a final action, or just save information stored on the load generators during the tests. For instance it can be used to save a CSV file created through a script to the OctoPerf report logs.
#!/usr/bin/env bash
mv file.csv ${HOST_NAME}.file.csv
uploadFile ${HOST_NAME}.file.csv
mv to add the load generator hostname to the file name.
This way when we upload it to OctoPerf with uploadFile if there are several load generators, the file is not overwritten.
It will then be available along with the JMeter logs in the report.
Warning
The uploadFile command will gzip your file and remove the local copy. Be careful if using it in a before-test.sh script or with a file that must be reused at a later stage.
Upload OctoPerf JMX to test logs
#!/usr/bin/env bash
mv ${JMETER_HOME}/scenario.jmx ${JMETER_HOME}/${HOST_NAME}.scenario.jmx
uploadFile ${JMETER_HOME}/${HOST_NAME}.scenario.jmx
Similarly to uploading a CSV, this script will upload the JMX file that was executed on each load generator. This can be interesting for debugging purposes or if you are not sure how OctoPerf will interpret some of your settings.
Warning
The uploadFile command will gzip your file and remove the local copy. If you upload the JMX in a before-test.sh script, JMeter will not be able to run.
Print Environment variables
This script will be executed just before the test starts and right after all load generators are created. It will display all environment variables and their values. Can be used for debugging.
#!/usr/bin/env bash
printenv
Count Lines of a CSV File
You might want to ensure that your CSV file has enough values to conduct your load test,
especially if you specified the Stop VU on EOF policy on your variable.
This script count the number of lines for the file myfile.csv.
#!/usr/bin/env bash
wc -l "${JMETER_HOME}/resources/myfile.csv"
SSL Handshake Failure
Due to recent SSL changes in JDK 21+ (which we use inside JMeter containers), you may encounter the following issue when testing an HTTPS website:
javax.net.ssl.SSLHandshakeException: (handshake_failure) Received fatal alert: handshake_failure at java.base/sun.security.ssl.Alert.createSSLException(Alert.java:130) at java.base/sun.security.ssl.Alert.createSSLException(Alert.java:117) at java.base/sun.security.ssl.TransportContext.fatal(TransportContext.java:370) at java.base/sun.security.ssl.Alert$AlertConsumer.consume(Alert.java:287) at java.base/sun.security.ssl.TransportContext.dispatch(TransportContext.java:209) at java.base/sun.security.ssl.SSLTransport.decode(SSLTransport.java:172) at java.base/sun.security.ssl.SSLSocketImpl.decode(SSLSocketImpl.java:1506) at java.base/sun.security.ssl.SSLSocketImpl.readHandshakeRecord(SSLSocketImpl.java:1421) at
It fails because in JDK 21+ TLS_RSA_ is in its default jdk.tls.disabledAlgorithms. Some ciphers have been disabled in recent Java JDKs.
To fix the issue, you must create and upload the following files in your project files:
#!/usr/bin/env bash

JAVA_SECURITY_OVERRIDE="${JMETER_HOME}/resources/java.security"


echo "[Pretest] JVM security override written to ${JAVA_SECURITY_OVERRIDE}"


export JVM_ARGS="${JVM_ARGS:-} \
  -Djava.security.properties=${JAVA_SECURITY_OVERRIDE} \
  -Djavax.net.debug=all -Dlog_level.org.apache.http=DEBUG -Dlog_level.org.apache.jmeter.protocol.http=DEBUG "

echo "[pre_test] JVM_ARGS exported"
echo "[pre_test] Done. Launch JMeter in this shell session to inherit the env."
And the following java.security file. This file comes from Java OpenJDK 17 which stills allows older ciphers to be used.