Jenkins Getting started
OctoPerf integrates with the most used Continuous Integration server: Jenkins. Continuous Integration is the heart of Agile companies who run tests on a daily basis.
By integrating load tests in their continuous integration cycles, companies can quickly spot performance regressions during the development phase. This is crucial to drill down to the issue very quickly, and fix performance hogs as soon as they occurs.
What is Jenkins

Jenkins is the lead open-source automation server. Thousands of companies use it to run software builds, tests and deployments every day. Jenkins can be extended by using plugins. To run load tests on Octoperf directly from Jenkins, you need to install Octoperf Jenkins Plugin.
Plugin
The OctoPerf Plugin allows to launch load tests on Octoperf directly from Jenkins. The job will not only launch the test but also:
- Run the Jenkins job until the test is finished,
- Fetch various test statistics during the test run and output them in the build console,
- Download JUnit report and store it in the build,
- Download JMeter logs and store them in the build.
The various reports and logs downloaded when the test is finished allow to have performance trends graphs and build status according to the test health (errors, assertion failures and more).
Installation
Our load testing Jenkins plugin can be installed directly from Jenkins UI. The following procedure explains how to install it:
- Login to Jenkins and select Manage Jenkins in the left menu,
- Select Manage Plugins,
- Select Available tab and enter OctoPerf in the Filter box in the top right corner,
- Finally, select one of the install options and restart Jenkins.
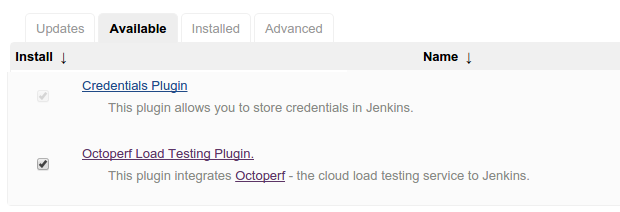
Now, an OctoPerf account must be provided to connect Jenkins to our Cloud load testing platform.
System Settings

The server URL is fully configurable. To use the Jenkins plugin with OctoPerf On Prem Infra, enter the appropriate Server URL according to your setup. By default, the plugin is configured to use the Saas platform.
Credentials
This section explains how to add an OctoPerf account to Jenkins. This step is required to connect to Octoperf and launch load tests from a Jenkins job:
- Login to Jenkins and select Credentials in the left menu,
- Select Global Credentials in the credentials table,
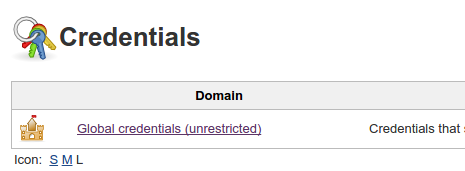
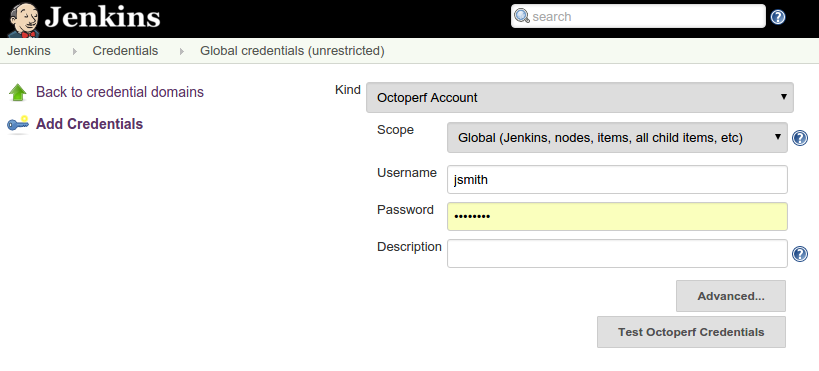
- Select Add Credentials,
- In kind select Octoperf Account and then provide your account username and password,
- Test the credentials by clicking on Test OctoPerf Credentials, this will try to login on our platform,
- When finished, click on OK to add the credentials.
You should end up with the account being added to the global credentials list.

Jenkins Global credentials configuration
Now, it's time to create a Jenkins job which will execute a load test on OctoPerf.
Job Setup
Freestyle
The following procedure explains how to setup a Jenkins job which runs a load test and collects some test results for reporting:
- Login to Jenkins and click on New Item in the left menu,
- Give the job a name and select Freestyle project or any relevant project type,
- Select OK to create the job, you should be redirected to the project configuration page,
- In the Build section, select Add Build Step and Select OctoPerf.
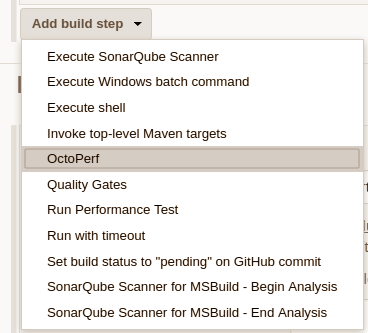
Now, we have a build configured to launch a load test on our load testing platform. It's time to configure the build step:
- Select the Credentials used to login,
- Select the Workspace,
- Select the Scenario to run, the combobox should autofill with information gathered from our servers,
- Optionally define Test Stop Conditions.
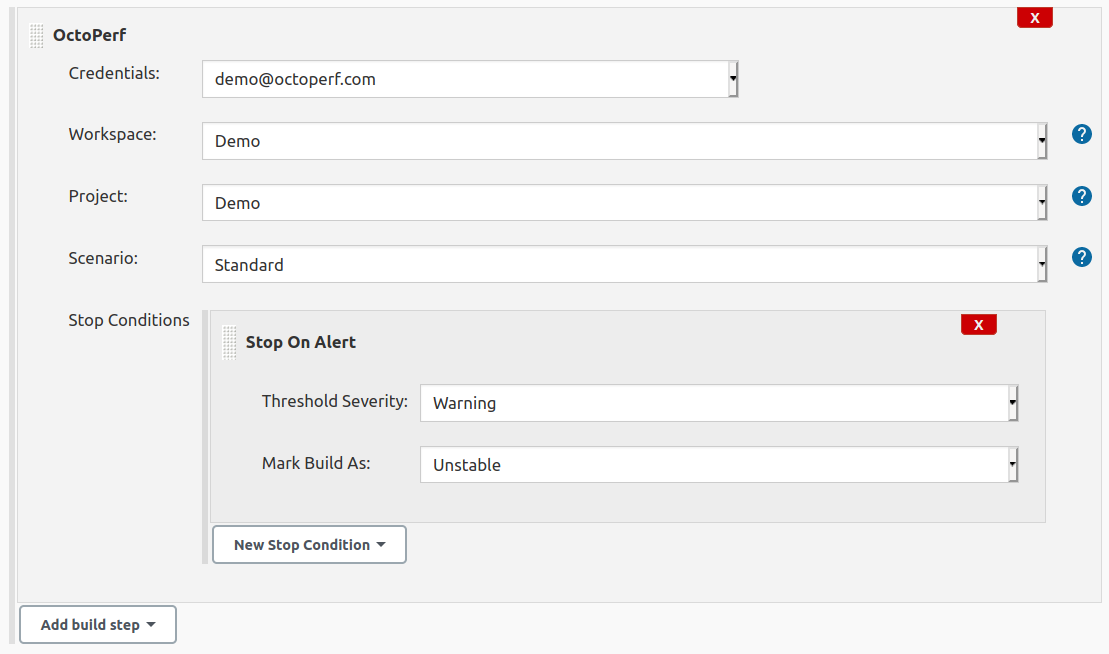 Build step configuration
Pipeline
OctoPerf Jenkins plugin supports the pipeline syntax since version 3.2.0. Here is an example Jenkins Pipeline Script written in Groovy:
node {
    stage ('OctoPerf') {
        octoPerfTest credentialsId: 'XXXXXX-XXX-XXX-XXXX', scenarioId: 'XXXXXXX'
    }

    stage ('JunitReport') {
        junit 'junit-report.xml'
    }

    stage ('PerfReport') {
        perfReport modeThroughput: true, sourceDataFiles: '**/*.jtl'
    }
}
Note
credentialsId corresponds to the Jenkins credentials Id.
If you are unsure of the syntax or various Ids, you can use the pipeline snippetizer to generate your pipeline syntax.
The script above defines three stages:
- OctoPerf: runs a given scenario on OctoPerf, collects Junit and JMeter JTL reports,
- JunitReport: analyzes and publishes Junit reports using JUnit Plugin,
- PerfReport: analyzes and publishes JMeter JTL reports using Performance Plugin.
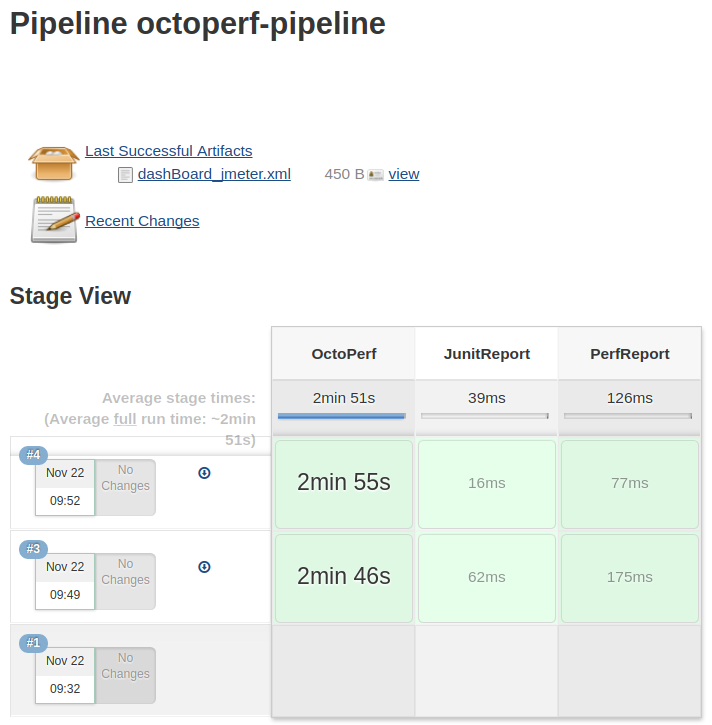
Thanks to pipeline support, OctoPerf tests can be fully integrated into a devops continuous integration cycle.
Execution
We can now run a load test from Jenkins by launching the job. The job execution should display various information about the test run including:
- Scenario being run,
- Basic statistics like Hits, Errors and Response time,
- And build status.
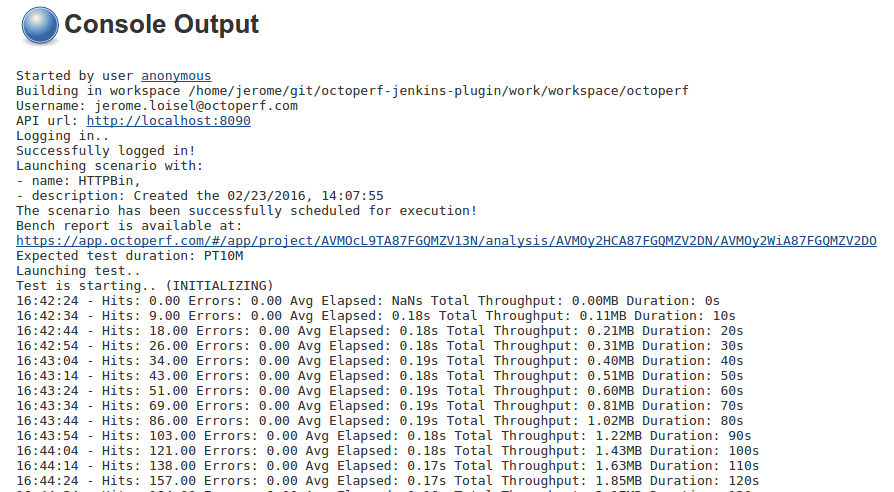
Various logs and metrics about the test
The build status indicates if the test has been successfully run on Octoperf. It does not reflect if errors or assertion failures happened during the load test. In order to get performance trends and build status depending on the errors faced during the test, our plugin stores JMeter logs and junit reporting.
JUnit Reporting
The Jenkins plugin generates and stores a JUnit report at the end of the test in the file junit-report.xml. This is especially useful if the build should be marked as unstable or failed when errors or assertion failures are encountered during the test run.
JUnit Report configuration
- Edit the job configuration,
- Select Add Post-build step, then select Publish JUnit result report,
- Specify junit-report.xml in the Test Report XMLs.
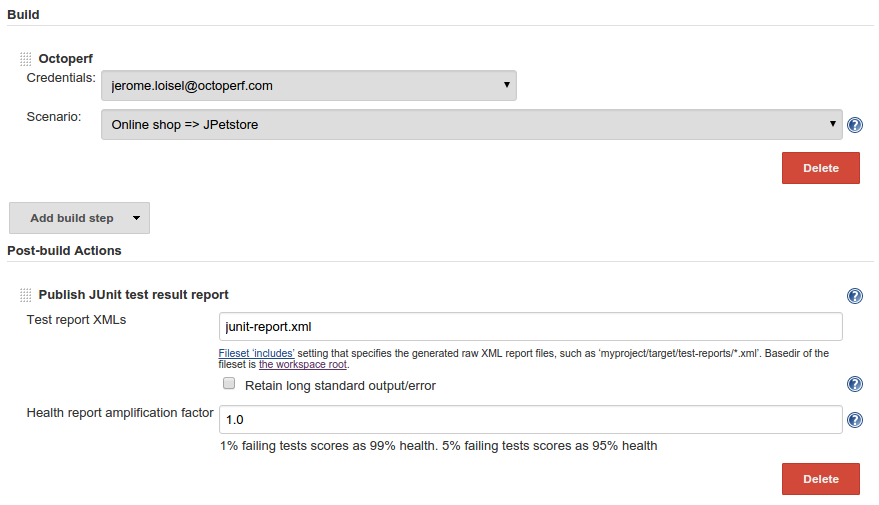
JUnit Post build step configuration
This instructs the Jenkins job to take the JUnit results generated by our servers and convert them to readable test results. The generated junit report only includes containers.
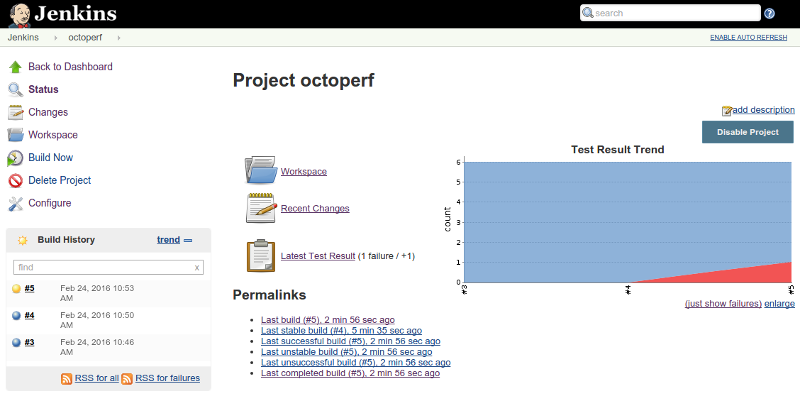
Build Test Trends showing a regression on last build.
The screenshot above shows a sample load test project with Test result trends. As seen above, the last build encountered some failures. By clicking on Latest Test Results link, detailed test results are shown.
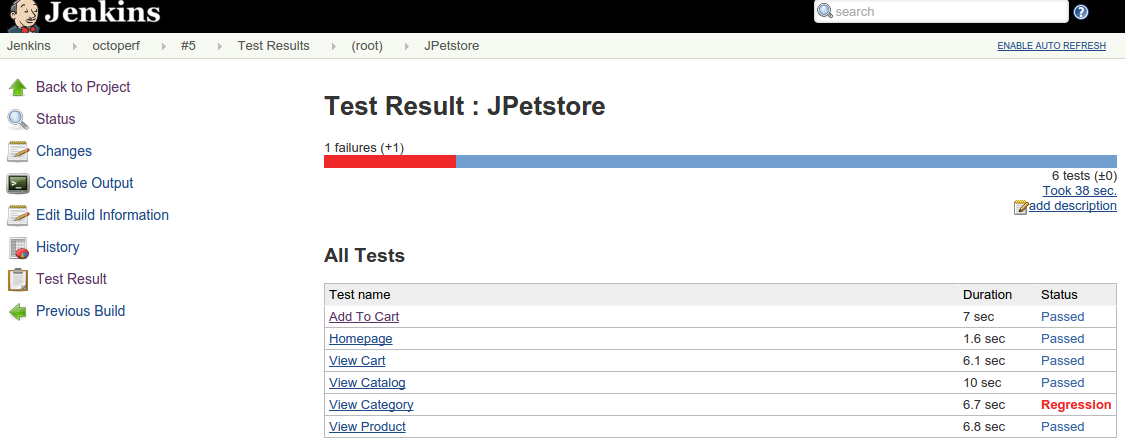
Thanks to these results, users can quickly spot performance regressions. Triggering tests with assertions from Jenkins can be used to run functional tests. The complete test report can be viewed in our online reporting for further analysis.
Performance Reporting
The Jenkins Performance plugin combined with Octoperf Jenkins Plugin fully unleashes the power of running load tests inside Jenkins. The Performance plugin allows to capture performance metrics from JMeter logs. Jenkins will generate graphic charts with performance trends. Based on the performance metrics, the build status can be set as good, unstable or failed.
Octoperf's Jenkins plugin downloads and stores the JMeter logs in the logs folder. to get performance graph trends and metrics inside Jenkins when running load tests on Octoperf:
- Install the Performance Plugin,
- Edit the job configuration and add a Post-build action named Publish Performance test result report,
- Configure the performance plugin as desired.
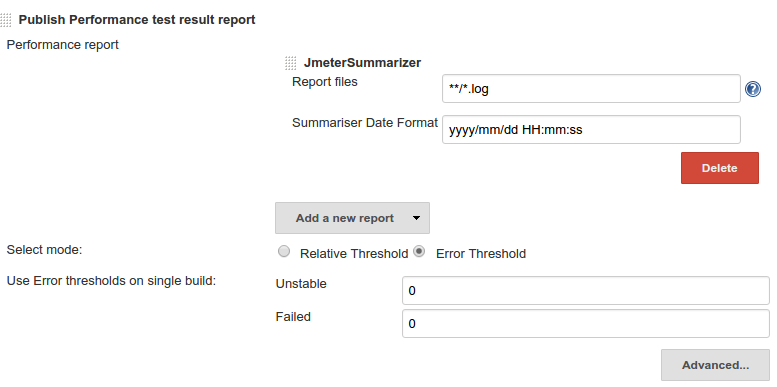
After running a few performance tests, it should start showing up performance metrics and trends on the job page like shown on the screenshot below.
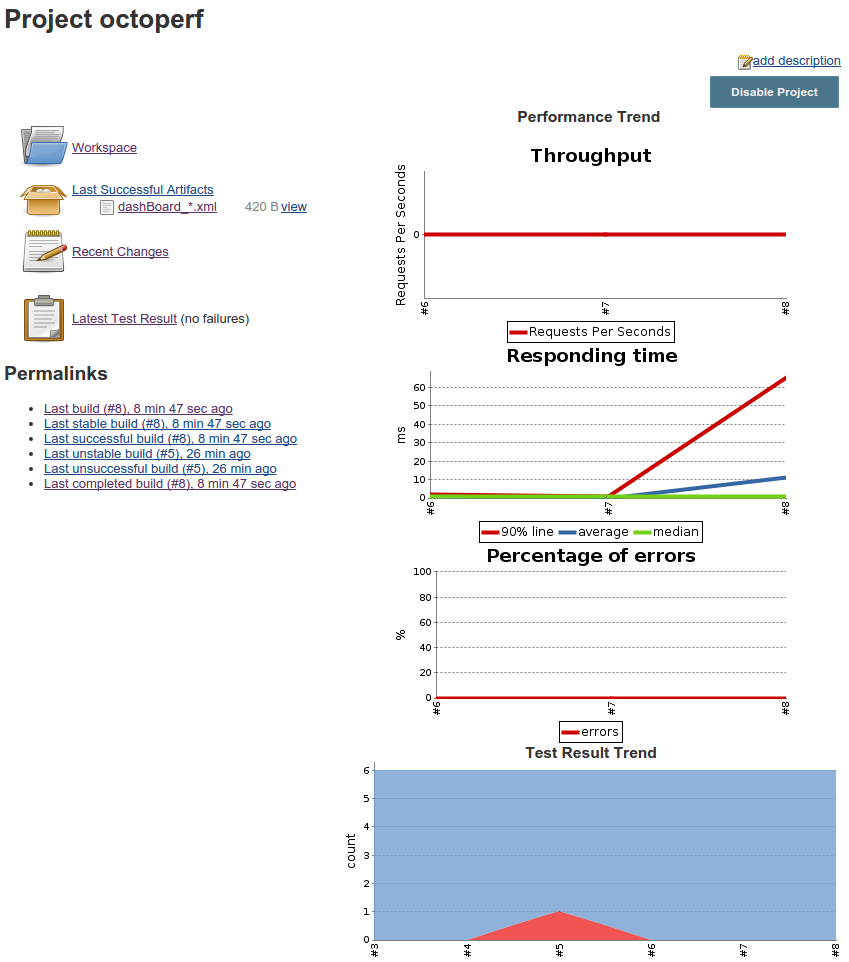
The performance trend graphs allow to have an history of the build performance. This is particularly useful to spot slow growing performance issues.
Online reporting
Link to the online report is published at the beginning of the build logs. Every test run from Jenkins has an associated analysis report on our cloud platform.