HTTP Actions
The HTTP Action lets you send an HTTP/HTTPS request to a web server. There are height types of HTTP request actions. One for each HTTP method.

The HTTP Action is composed of many sections in order to configure:
Base Settings
Base URL
The request URL usually looks like this: http://petstore.octoperf.com:80/actions/Catalog.action?viewProduct&productId=K9-DL-01.
This URL is divided in 3 parts:
- The server
http://petstore.octoperf.com:80. - The path
/actions/Catalog.action. - The parameters
?viewProduct&productId=K9-DL-01are configured in the Query Parameters tab.
Server

The request server can be selected using the server combo box. All servers are configured in the servers view but it is possible to create a new one with the Add Server button.
Path
The path lets you type the address of the resource to call on the server (here /actions/Catalog.action).
Info
The initial / will be automatically added if you omit it.
Settings

| Option | Description |
|---|---|
| Name | Override the HTTP request default name (otherwise the default name is the request path). |
| Follow redirects | If this option is selected, OctoPerf checks if the response is a redirect (status code 3xx) and follows it. |
| Content Encoding | Content encoding to be used (for POST, PUT, PATCH and FILE). This is the character encoding to be used, and is not related to the Content-Encoding HTTP header. Default value (if left empty) is UTF-8. |
| Download Resources | Enables the automatic download of resources, more details below. |
Download Resources
If this option is selected, OctoPerf parses the HTML file received and sends HTTP/HTTPS requests for all images, Java applets, JavaScript files, CSSs, etc. referenced in the file.
Note
If the request has a HOST header it will be used when fetching the resources as well. When the resources have a different domain, this can generate 404 responses. To prevent this, remove the HOST header from the main request.
During runtime, only a single aggregated value for all Resources will be displayed. But when you run a validation they will all be displayed with the label Sub result in the Debug panel:

In the above screenshot, the difference between the label Validation and the first sub result Catalog.action is in the timings. If you only check the request/response contents, you'll notice they are identical, that's because:
- Validation contains the time between the main request was sent and the last resource was downloaded (depending on parallel downloads),
- Catalog.action contains the time for this particular HTTP request only.

Warning
This option consumes a lot of computing power, to compensate for that we will consider the virtual users as Heavy VUs.
Parallel Downloads Number
Modern browsers use ~6 parallel threads for downloading embedded resources. Adjust the value up or down to mimic browser(s) you would like to simulate.
URLs Must Match
If present, this must be a regular expression that is used to match against any embedded URLs found. You can use it to:
- Allow a single domain:
http://example\.com/.*, - Forbid a list of domains:
^((?!<domain #1>|<domain #2>|<domain #3><domain #4>|<domain #5>).)*$
Think Time
The think time allows you to pause your Virtual Users after the processing of an HTTP Request Action. It can be configured to pause for a constant,range or text delay. Its value is automatically set if you import a HAR file to create a Virtual User. We use the requests timestamps to compute the time between them for you.
As they serve to represent user interaction delay, Think times are not taken into account when computing server response times.
Warning
If a think time is higher than the remaining duration for the test, the virtual user will be stopped automatically. This mechanism is used to free memory but it will be visible on the # of Users statistics of the report. To avoid this it is recommended to use small values in regards to the test duration (for example: less than 1 min for a 1 hour test)

| Type | Description |
|---|---|
| Constant | Constant waiting time, from 0 to 99999. Unit can be selected. |
| Range | Random waiting time between two boundaries, from 0 to 99999. Unit can be selected. |
| Text | Constant waiting time, can be a variable name. Always in milliseconds. |
Query Parameters
The Query Parameters section shows a table that contains one row for each query parameter. For instance with the parameters ?viewCategory&categoryId=DOGS:

| Column name | Description |
|---|---|
| Name | The name of the query parameter. |
| = | Select this option to include an '=' after the parameter name. Mandatory when the parameter has a value. |
| Value | The value of the query parameter. |
| Encode | Should this query parameter name and value be encoded. URL encoding replaces unsafe ASCII characters with a "%" followed by two hexadecimal digits. |
 |
Click this icon to add a new parameter at the end of the list. |
 |
Click this icon to remove a parameter. Be careful, this action cannot be undone. |
Info
The search functions are detailed in this section of the navigation page.
Request Headers

The HTTP Headers section is a table with one row for each request header. HTTP headers lets you define, among many other things:
- The expected content type,
- The content length,
- The authorization,
- The accepted charset, encoding and language,
- ...
Info
The Cookie header is automatically handled by the platform. You do not need to extract or inject it.
The User-Agent is overwritten when the Virtual User is running. The configuration of the User Agent is done in the user profile settings.
| Column name | Description |
|---|---|
| Name | The name of the header. |
| Value | The value of the header. |
|
Click this icon to add a new header at the end of the list. |
|
Click this icon to remove a header. Be careful, this action cannot be undone. |
 |
Select a header name from the most used headers list. |
Info
The search functions are detailed in this section of the navigation page.
Request Body
The request body, or POST data, exists in 5 types:
- Multipart: The content type
multipart/form-datashould be used for submitting forms that contain files, non-ASCII data, or binary data. Withmultipart/form-datano characters are encoded. This value is required when you are using forms that have a file upload control. - Urlencoded: The content type
application/x-www-form-urlencodedis inefficient for sending large quantities of binary data or text containing non-ASCII characters. Usingapplication/x-www-form-urlencodedall characters are encoded before being sent (spaces are converted to "+" symbols, and special characters are converted to ASCII HEX values). - Raw text requests: For
text/plainspaces are converted to "+" symbols, but no special characters are encoded. - File: Particular use case of
application/x-www-form-urlencodedthat focuses on uploading a single file, - None: When this request doesn't have a body at all (GET requests for example).
Tip
Duplicate the request before playing with the request body settings. When you switch between body types the body is emptied.
Form-data

The multipart/form-data content-type is used by web browsers if the form contains the enctype="multipart/form-data" attribute.
| Column name | Description |
|---|---|
| Type | Text or File |
| Name | The name of the POST parameter. |
| Value | The value of the POST parameter. |
| Content Type | Mime type of the embedded file. |
|
Click this icon to add a new parameter at the end of the list. |
|
Click this icon to remove a parameter. Be careful, this action cannot be undone. |
Info
The search functions are detailed in this section of the navigation page.
In some situations, it is required to only send the Content-Disposition header, that is possible through the Browser-compatible headers option, here's a comparison using the above example:


Urlencoded

| Column name | Description |
|---|---|
| Name | The name of the POST parameter. |
| = | Select this option to include an '=' after the parameter name.Mandatory when the parameter has a value. |
| Value | The value of the POST parameter. |
| Encode | Should this POST parameter name and value be encoded. URL encoding replaces unsafe ASCII characters with a "%" followed by two hexadecimal digits. |
|
Click this icon to add a new parameter at the end of the list. |
|
Click this icon to remove a parameter. Be careful, this action cannot be undone. |
Info
The search functions are detailed in this section of the navigation page.
When a web browser sends a POST request from a web form element, the default media type is application/x-www-form-urlencoded. For these requests, OctoPerf automatically adds the appropriate Content-Type header and converts the parameters. application/x-www-form-urlencoded is a format for encoding key-value pairs with possibly duplicate keys. Each key-value pair is separated by an '&' character, and each key is separated from its value by an '=' character. Keys and values are both escaped by replacing spaces with the '+' character and then using URL encoding on all other non-alphanumeric characters.
For example, the key-value pairs
- Name: Jonathan Doe
- Age: 23
- Formula: a + b == 13%!
are encoded as Name=Jonathan+Doe&Age=23&Formula=a+%2B+b+%3D%3D+13%25%21
raw

The raw POST only contains a text input.
You can simply type or paste the content of your request payload.
Variables are allowed inside the payload as for any other POST parameter.

You can change the format of the raw POST data by using the  button. The request
 Content-Type header is automatically modified according to this format. And you can use the Format content option to make the raw content easier to read.
Info
Setting the right formatting is not mandatory. If you don't plan on using it, just make sure that your payload is valid and manually add the proper headers.
Warning
For performance reasons, raw bodies of more than 20 Mb cannot be saved through OctoPerf's UI. In that case, you need to use a file instead. Note that files are usually limited to 100 Mb on the SaaS platform.
file

The file option lets you add one single file to your request body.
With this option the content of the file is copied directly into a the POST body. It is possible to achieve the same through a raw body if you copy/paste your file in it but that will inflate the size of your virtual user and can impact its performance.
| Column name | Description |
|---|---|
| Name | The name of the file as specified in the files menu. |
| Content Type | Mime type of the embedded file . |
Warning
Some HAR recorders will not save the file into the request body. Because of this we cannot detect that it is a file upload and you will have to manually upload the file and activate this option.
Debug
In order to validate your configuration we recommend to:
- Replay your HTTP requests with the VU validation panel,
- Then you can debug the content of your requests and responses in the Debug panel,
- Once you've reached a satisfactory result, you can proceed to a real test.

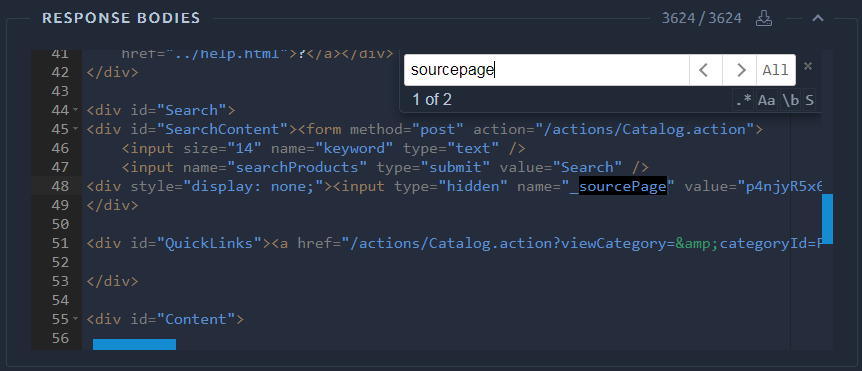
The debug panel allows you to view the requests and responses played during the record of the Virtual User and during a Validate VU.
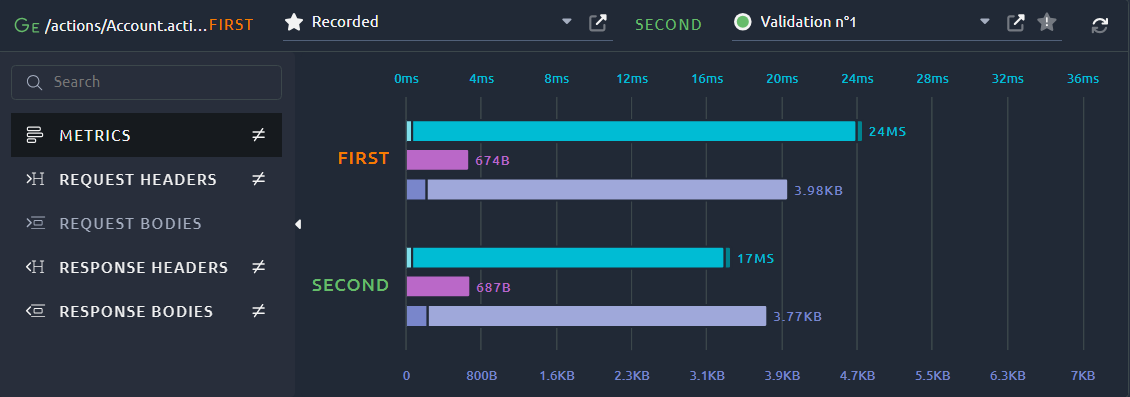
You can use the LEFT and RIGHT drop down lists to select an occurrence. When a different occurrence is selected in each of these lists, the Debug panel will switch to Comparison mode.
To revert back to the Detailed mode, just select the same occurrence in both FIRST and SECOND lists.
Tip
If you create a Virtual User by hand (without importing a HAR), recorded requests and responses are not present. You may run a validation to get requests / responses.
| Icon | Action | Description |
|---|---|---|
 |
Save as recorded | This action will overwrite the recorded response with the new one. Be careful, it cannot be undone. |
 |
Open in a new tab | Sends the response content in a new browser tab to attempt rendering it. |
Debug Request


You can click on the left Request section to access the Debug Request section. It displays:
Debug Response


You can click on the left Request section to access the Debug Request section. It displays:
Timings
In this section you can see various metrics regarding the requests. Hover your mouse on one of the bars to see the nature of this metric.
The various metrics are:
- Response times split in Connect time/Latency/Elapsed time,
- Request size,
- Response size split in Response Headers size and response body size
Warning
The recorded shows timings from your browser, they can be very different from timings of the validations executed from our cloud agents.
Detailed mode
When only one occurrence is available or, the same occurrence is selected in both FIRST and SECOND drop down lists, the detailed mode is activated.
On top of this, you can use the top right menu to perform actions:
| Icon | Action | Description |
|---|---|---|
 |
Enable/Disable auto format | Toggle the content formatting for this box. |
 |
Expand in new window | Opens a new window, giving you more space to work with. |
Tip
You can use the same shortcuts as in code blocks. Check the dedicated page for more info.
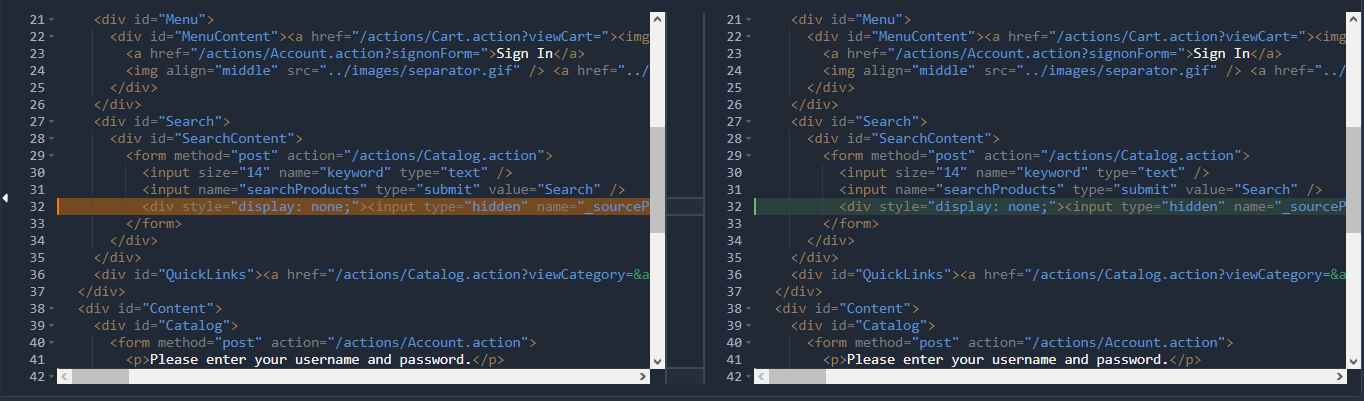
Comparison mode
When a different occurrence is selected in FIRST and SECOND drop down lists, the debug panel switches to comparison mode. In that mode the text editor is slightly less powerful but instead you can use it to compare Headers or bodies across different occurrences.
| Icon | Action | Description |
|---|---|---|
 |
Go to Previous/Next difference | Move through detected differences. |
|
Enable/Disable auto format | Toggle the content formatting for this box. |
 |
Switch comparison mode | Toggle between side by side and in line comparison. |
|
Expand in new window | Opens a new window, giving you more space to work with. |
Tip
You can use the same shortcuts as in code blocks. Check the dedicated page for more info.