> OctoPerf's load testing projects documentation page. How to create, edit or remove a project in OctoPerf load testing solution.
Source: https://api.octoperf.com/doc/project/
# Load Testing Projects
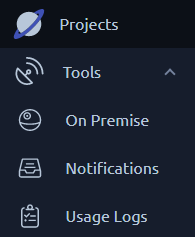{ align=left }
The project menu only appears after you select a [workspace](https://api.octoperf.com/doc/workspace/).
From there you have access to all the contents of the workspace:
- The [list of all projects](#project-list)
- [On-Premise Agents](https://api.octoperf.com/doc/on-premise-agent/)
- [Notifications](https://api.octoperf.com/doc/notifications/),
- [Usage logs](https://api.octoperf.com/doc/usage-logs/).
## Project list

Several actions are available when placing your mouse over an existing project in the list:
| Action | Description |
| --- | --- |
| [Create new Project](#create-a-project) | Create new empty project.|
| [Edit Project](#edit-a-project) | Opens the edition panel to let you change the project name and description.|
| [Move Project](#move-a-project) | Moves this project to another [workspace](https://api.octoperf.com/doc/workspace/). |
| [Delete Project](#remove-a-project) | Lets you remove a Project in one click. All the components (VU, Scenario, test reports, etc.) of the project are also removed. This operation cannot be reverted so proceed with caution.|
!!! Info
The search functions are detailed in [this section of the navigation page](https://api.octoperf.com/doc/navigation/#filters).
## Create a project
When you click on **create a new project**, you will be prompted with this menu:

The new project will then be highlighted in the list with a  icon tag.
!!! info "Limits on OctoPerf SaaS"
A workspace can hold up to **100 projects**, and you can create at most **2 projects per minute**. The Sample Project counts like any other, but the copies of projects kept with test results do not.
Beyond 2 creations in a minute, the next one is refused with the message `Too Many Requests!`: wait a minute, then try again.
Once the limit is reached, a new project is refused with the message `Quota reached: 100 projects per workspace`, and so is a project [moved](#move-a-project) into this workspace. Your existing projects are kept: [remove](#remove-a-project) the ones you no longer need, or [create another workspace](https://api.octoperf.com/doc/workspace/#create-a-workspace).
On Enterprise Edition, the administrator sets these limits: see [Quotas](https://api.octoperf.com/doc/on-premise-infra/configuration/#quotas) and [Rate Limits](https://api.octoperf.com/doc/on-premise-infra/configuration/#rate-limits).
## Edit a project

This screen allows you to change the name and description of your project.
For more info about tags, check the [dedicated section](#tags).
!!! info
The description can contain [markdown](https://en.wikipedia.org/wiki/Markdown)/[HTML](https://developer.mozilla.org/en-US/docs/Web/HTML), it can be configured with our [code editor](https://api.octoperf.com/doc/design/edit-virtual-user/code-editor/).
## Remove a project
To avoid mistakes, project removal can only be achieved by **typing the project name as a confirmation** is the dialog box:

!!! warning
Deleting a project deletes all the data it contains (virtual users, scenarios, monitored machines, test reports, etc.).
## Move a project

This option allows you to **move your project into another workspace**. This is useful when you need to merge your work with another team, or after someone left the organization to regroup everything under the same workspace. As **the entire project is transfered, nothing is lost**, design runtime and results will appear in the new workspace as they did in the old one.
!!! warning
If you transfer a project into a workspace that you do not own **it may become unavailable to you**. This is especially true when you do not have read or write permissions on the entire destination workspace.
## Tags
Tags are short labels you can attach to a project or any of its elements, such as a version (`v1`, `v2`), an environment (`dev`, `prod`), a team name, or anything else useful. They are visible at a glance in the lists and can be used as filters to narrow down what you see.
### How to use the Tags field

The Tags field appears on every form that supports tags (project, Virtual User, Scenario, Monitoring Connection, Test Report). It works the same way everywhere:
- Type a tag name and press **Enter** to add it.
- Pick an existing tag from the **autocomplete dropdown** to reuse it. The dropdown matches any part of the tag name (not only the beginning), and lists tags already used anywhere in the project (on the project itself, Virtual Users, Scenarios, Monitoring Connections or Test Reports).
- Click the **×** on a chip to remove it.
Hovering the **Tags** label opens a tooltip that summarizes these instructions, plus context specific to the current form. On the project edition page, the label is also clickable and opens this documentation page directly.

### Project-level tags
Tags added directly on a project behave differently from tags added on individual elements.
**1. They are copied to newly created elements.** When you create a Virtual User, Scenario, Monitoring Connection or Test Report inside a project, that element starts with the same tags as the project.
!!! info
The copy happens **once, at creation time**. Adding or removing a tag on the project later does **not** change the tags of elements that already exist.
**2. They let you pre-filter the lists you browse.** When the current project has tags, the **Project** navigation menu shows an **All / Project tags** toggle next to the *Browse Virtual Users*, *Browse Scenarios*, *Browse Monitor Connections* and *Browse Reports* links.

- **All** (default): opens the list without any tag filter.
- **Project tags**: opens the list with the project's tags applied as a starting filter, so you immediately see only the elements that share them.
The toggle is a navigation shortcut: once a list is open, you can still adjust or remove the tag filter from the list's filter bar. The toggle resets to **All** every time you switch project, so each project starts with an unfiltered view.
### Editing tags on an element
You can edit the tags of an individual Virtual User, Scenario, Monitoring Connection or Test Report at any time from its edit dialog. These changes only affect this element; the project and the other elements are not modified.
### Bulk update of tags
When you need to tag many elements at once, select them in the list (Virtual Users, Scenarios, Monitoring Connections or Test Reports) and open the **more** menu in the selection action bar. The **Update tags** action opens a dialog where you can:

- Choose **Add tags** to attach one or more tags to every selected element. Elements that already have a given tag are left unchanged.
- Choose **Remove tags** to detach one or more tags from every selected element. Elements that do not have a given tag are left unchanged.

Click **Apply** to run the update. A progress dialog reports how many elements were modified, and a notification confirms the result. If every selected element is already in the desired state, an informational message is shown and nothing is changed.